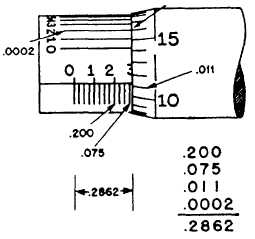
Figure 2-41.—Reading a vernier scale micrometer.
number, as that many ten-thousandths of an inch,
to the original reading. In figure 2-41, see how the
second line on the vernier scale matches up with a line
on the thimble scale.
This means that the 0.011 mark on the thimble
scale has been advanced an additional 0.0002 beyond
the horizontal sleeve line. When you add this to the
other readings, the reading is 0.200 + 0.075 + 0.011 +
0.0002 or 0.2862, as shown.
Inside Micrometer
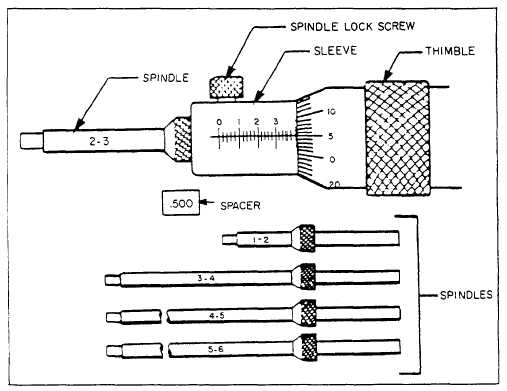
The inside micrometer, as the name implies, is
used for measuring inside dimensions, such as pump
casing wearing rings, cylinders, bearings, and bush-
ings. Inside micrometers usually come in a set that
includes a micrometer head, various length spindles
(or extension rods) that are interchangeable, and a
spacing collar that is 0.500 inch in length. The spin-
dles (or extension rods) usually graduate in 1-inch
increments of range; for example, 1 to 2 inches, 2 to 3
inches (fig. 2-42).
The 0.500 spacing piece is used between the spin-
dle and the micrometer head so the range of the mi-
crometer can be extended. A knurled extension handle
is usually furnished for obtaining measurements in
hard-to-reach locations.
To read the inside micrometer, read the microme-
ter head exactly as you would an outside micrometer,
then add the micrometer reading to the rod length
(including spacing collar, when installed) to obtain
the total measurement.
When the 1- to 2-inch spindle is used, and the
sleeve and thimble scales are set to 0.00 inch, the
distance between the face of the anvil and the face of
the spindle is exactly 1.00 inch.
Figure 2-42.—Inside micrometer set.
2-27


