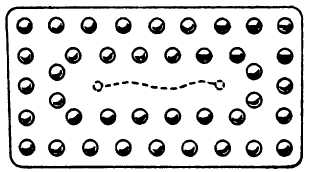
Figure 13-58.—Lap patch for repairing a crack in stressed
skin.
To repair cracks, you should always drill a small
hole (normally called stop drilling) in each end of the
crack before applying the patch. This is normal] y
done by using a No. 30 or No. 40 drill bit. This
prevents the concentration of stresses at the apex of
the crack and distributes the stresses around the
circumference of the hole. The patch must be large
enough to install the required number of rivets as
determined from the rivet schedule indicated for the
gauge material in the area that is damaged. See
figure 13-58. The recommended patch may be cut in
a circular, square, rectangular, or diamond shape. The
edges are normally chamfered (beveled) to an angle
of 45 degrees for approximately one-half its
thickness.
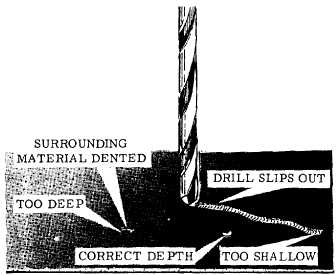
The rivet pattern is laid out on the patch by using
the proper edge distance and spacing. The installation
position of each rivet is marked with a center punch.
The impression in the material made with the center
punch helps to keep the drill from slipping away from
the hole being drilled. See figure 13-59. Drill only a
minimum number of rivet holes in the patch; normally
four will suffice at an angle of 90 degrees to each
other. Position the patch over the surface being
repaired, and ensure that the correct edge distances
are being maintained. Drill four holes in the surface
being repaired, using the predrilled holes in the patch
as a pattern for alignment. As each hole is drilled,
using the proper temporary fasteners, secure the patch
in place. When the patch is temporarily secured, drill
the remaining rivet holes through the patch and the
surface being repaired. Remove the patch and deburr
all rivets holes with a deburring tool or a large drill
bit. Prime the repair materials with the proper
corrosion-preventive material before the riveting
operation. Secure the patch in position with
temporary fasteners to maintain alignment during
riveting. Riveting procedures were covered earlier in
this chapter.
Holes may be repaired in either stressed or
nonstressed skin that is less than three-sixteenths of
an inch in diameter by filling with a rivet. Drill the
hole and install the proper size rivet to fill the hole.
For holes three-sixteenths of an inch and larger, you
should consult the applicable structural repair manual
for the necessary repair information. The damaged
area is removed by cutting and trimming the hole to a
circular, square, rectangular, or diamond shape. The
corners of the hole should be rounded to a minimum
of one-fourth of an inch in radius. The lap patch is
fabricated and installed in the same manner as
previously explained for repairing cracks.
Flush Patches
A flush patch consists of a filler patch that is
flush with the skin after it is inserted. It is backed
up and riveted to a reinforcement plate that, in turn,
is riveted to the inside of the skin. This reinforce-
ment plate is usually referred to on some repair
diagrams as the doubler or the backup plate. On some
high-performance aircraft, only the flush patch is
permitted in making skin repairs.
Flush patches should be used where aerodynamic
smoothness is required. The type of flush patch used
depends on the location of the damaged area. One
type is clear of internal structures, and the other is not.
Like all types of repairs, you must consult the
applicable structural repair manual for the necessary
Figure 13-59.—Drilling holes for rivets.
13-43