INSTALLATION
Leakage of a flared tube assembly is usually
caused by the following:
Installation of tube assemblies involves a
preinstallation check before tube assemblies can be
installed. Before you install tube assemblies, check to
make sure there are no dents, nicks, and scratches;
that the assembly contains the correct nuts and
sleeves; that there is a proper fit, where fitting is
flared; that a proof pressure test is performed on each
assembly; and that the assemblies are clean.
To install tube assemblies, hand screw the nuts
onto mating connectors. Align the tube assembly in
place so that it will not be necessary to pull it into
place with the nut. Tubing that runs through cutouts
should be installed to avoid scarring when the tubing
is worked through a hole. If the tube assembly is
long, tape the edge of cutouts before installing the
assembly. Torque the nuts. Apply a protective
coating to the remaining nonsealed joints after tubing
is installed. For disconnected nonsealed joints, apply
MIL-S-8802, followed by appropriate paint system, if
required. For connected nonsealed joints, apply the
first coat of MIL-C-16173, grade 4; 1 hour after
applying the first coat, apply the second coat of
If an aluminum alloy flared tube assembly leaks
MIL-C-16173, grade
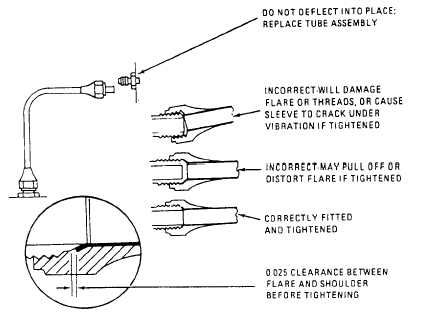
methods of installing
shown in figure 6-21.
4. Correct and incorrect
flared tube assemblies are
Flare distorted into the nut threads.
Sleeve cracked.
Flare out of round.
Flare cracked or split.
Inside of flare rough or scratched.
Connector mating surface rough or scratched.
Connector threads or nuts are dirty, damaged,
or broken.
after it has been tightened to the required torque,
disassemble it for repair or replacement. If a steel
flared tube assembly leaks, it may be tightened
one-sixteenth turn beyond the noted torque. If the
assembly continues to leak, it should be disassembled
for repair or replacement. Do not tighten a nut when
there is pressure in the line. Do not overtighten a
leaking aluminum alloy assembly. Overtightening
may severely damage or cut off tubing flare, or
damage sleeve or nut.
When you install flareless tube assemblies,
proceed as follows: Make sure no nicks or scratches
are evident and the sleeve is preset. Tighten the nut
Figure 6-21.—Correct and incorrect methods of installing flared fittings.
6-21