inspections.
You will find more detailed
information concerning automatic parachute
ripcord release assemblies in the Emergency
Personnel and Drogue Parachute Systems
Manual, NAVAIR 13-1-6.2, and the Maintenance
Requirements Cards, NAVAIR 13-600-4-6-3.
MAINTENANCE
Maintenance on any automatic ripcord release
in service must be performed each time its
parachute assembly is repacked. Maintenance
consists of the following:
. Disarming
. Inspection
. Firing altitude check
. Arming and assembly
. Checkout of armed mechanism
As you work on a automatic ripcord
release assembly, you are required to per-
form several different types of maintenance
and inspections.
You are required to in-
spect the operational condition of the auto-
matic ripcord release before installing it in
a parachute assembly. If you find any damage
or an inspection discrepancy, submit a quality
deficiency report, as discussed in OPNAVINST
4790.2 (series).
NOTE: Under no circumstances should
an unsatisfactory ripcord release be in-
stalled.
The first step in performing the normal
inspection and maintenance on a automatic
ripcord release is to disarm it. Then you are ready
to inspect and perform the firing altitude checks.
DISARMING
Anytime you are required to disarm a ripcord
release assembly, follow the procedures outlined
in NAVAIR-13-1-6.2. The discussion that follows
closely parallels those procedures. A parts
breakdown can be seen in figure 2-1.
NOTE: To remove the arming cable
housing from the ripcord release, de-
press the safety retainer release (fig. 2-1).
NEVER try to remove the arming cable
from an armed ripcord release assembly by
pulling on the cable. This fires the auto-
matic ripcord release.
1. Open the ripcord release pocket, and
remove the ripcord release only a sufficient
distance to allow disassembly.
2. Remove the locking screw and washer.
NOTE: The cover and power cable
housing assembly and the receiver and
barrel assembly are serialized matched sets.
Do not mix these assemblies.
3. Slide the cover off the receiver and barrel
assembly.
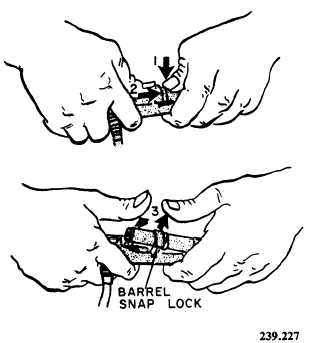
4. Disengage the barrel snap lock. A close-up
of this operation is shown in figure 2-2.
5. Remove the cartridge from the barrel as-
sembly (fig. 2-1). Do not proceed until the quality
assurance inspector (QA) has verified this step.
6. Remove the ripcord release assembly and
the arming cable housing from the parachute
container.
Figure 2-2.—Disengaging barrel snap lock.
2-3