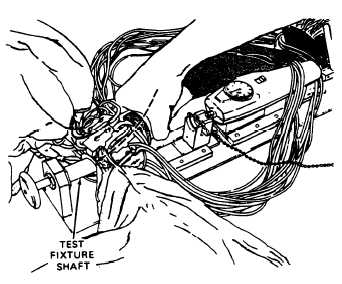
Figure 22-24.—Sliding on to test fixture.
so that the shaft butts against the bottom of the
cartridge chamber (fig. 2-24).
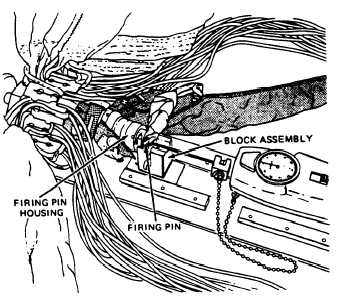
9. Open the four snap fasteners on the
spreading gun extractor sleeve to expose the firing
pin housing. Slide the block assembly at the center
of the test fixture under the firing pin housing
until the block assembly pin slides into the
baseplate hole. Align the firing pin so that the hole
in the firing pin is horizontal. The firing lanyard
is located at the top. (See figure 2-25.)
Figure 2-25.—Spreading gun installation.
10. Attach the hook assembly to the firing pin
hole, and slide the hook assembly block over the
nut that is attached to the pull gage. (See figure
2-21).
11. Move the switch on the pull gage to the
center position. You must zero your meter needle
by rotating the bezel on the dial. Move the switch
to the full down position, away from the meter,
for recording the pull force.
12. The QA verifies the test fixture lever firing
pin releases. The pull force must go between 25
and 38 pounds. If a gun has failed the first test,
it must be retested two more times. The gun must
pass both retests. Record the force required to
release the firing pin on the Parachute
Configuration, Inspection, and History Record.
When a gun fails, it is removed and returned to
supply as a defective item.
13. After the pull-force measurement has been
obtained, remove the hook assembly from the
firing gun.
14. Push the firing pin back into the housing.
Push the control disc firmly inward, forcing the
firing pin out of the housing. Apply inward hand
pressure to the firing pin as it moves out. Continue
to move the control disc inward, applying hand
pressure to the firing pin until it clicks into place.
When a click is heard, the gun is cocked. Gently
release the control disc while still exerting pressure
on the pin.
15. The QA inspector must tug gently on the
firing pin until the effect of spring loading is felt.
If the pin moves without spring tension, the gun
is not cocked, and step 14 must be repeated.
16. Release the block assembly by pulling the
pin out of the hole in the baseplate and sliding
the block away from the spreading gun. Remove
the gun from the shaft. Do not remove the gun
by pulling on the firing lanyard.
17. At this time, install the safety pin.
CAUTION
WHEN YOU ARE USING ALCOHOL
TO CLEAN THE CARTRIDGE CHAM-
BER, DO NOT ALLOW ALCOHOL TO
FLOW INSIDE THE GUN BECAUSE
THIS COULD DAMAGE THE O-RINGS
AND LUBRICATION.
2-14