239.446
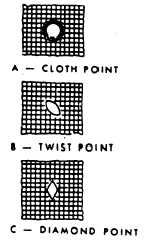
Figure 9-9.—Shapes of needle points.
239.447
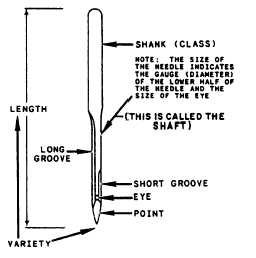
Figure 9-10.—Sewing machine needle.
Machine needles have along groove on one
side, and either a short groove or a scarf on the
opposite side, as shown in figure 9-10. The
purpose of the grooves is to allow the thread to
fall back into the needle when it enters the material
to prevent the thread from breaking or fraying;
therefore, it is important that the long groove be
placed in the machine properly. On different class
machines, the direction varies with the position
of the bobbin assemblies. 0n class 31 machines,
the long groove is placed to the left. The scarf is
to prevent the oscillating shuttle from striking the
needle as it passes close to the needle to pick up
the thread loop to form the lockstitch.
Needles are sized by the diameter or gauge of
the needle and the needle eye. The selection of
the correct size needle is determined by the size
and type of thread and material used. The thread
must pass freely through the eye of the needle to
prevent thread fraying or breaking. The sizes of
the class 16 x 87 needles used for most sewing will
range from size 18 through size 22. The needle
size number increases with the diameter of the
needle; therefore size 18 needles are used for
lighter weight materials than size 22. Listed below
are some of the needle sizes you will be working
with and their uses:
1.
2.
3.
4.
5.
Size 18. For sewing two to four plies of thin
material, such as silk, nylon, or rayon, with
size E thread.
Size 20. For sewing five or more plies.
Size 21. For sewing two to four plies of
medium weight materials, such as aircraft
cloth, 12-ounce duck, light leather, and
artificial leather.
Size 22. For sewing two to four plies of
medium weight material, such as heavy
duck, lightweight and medium weight web-
bings, and russet leather.
Size 24. For sewing elastic or rubberized
—
materials.
You should check the condition of the needle’s
point before you start to sew. A dull or rough
round needle acts the same as a cutting needle.
It cuts or pulls threads and may weaken the seam.
The condition of a needle may be checked by
sliding the fingernail over the point. If it scratches
or catches the nail, the needle should be replaced
with a new one. A dull needle may be sharpened
by placing it in the chuck of a drill press, and the
drill operated at high speed while holding a fine
grain sharpening stone lightly against the side of
the needle at the proper angle. The point is then
polished with a piece of russet leather.
Having selected the proper needle, turn the
balance wheel toward you until the needle bar
moves to its highest point. Loosen the needle
clamp screw and put the shank of the needle up
into the groove as far as it will go. Turn the long
groove so that it faces to the left and is directly
in line with the arm of the machine. Then tighten
the clamp screw, and check to see that the needle
does not turn or slip. For troubleshooting, refer
to table 9-1.
9-9