239.309
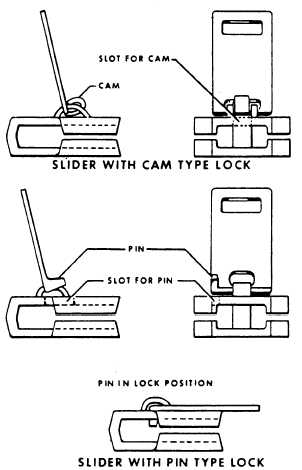
Figure 10-20.-Slide fastener pull tabs.
A brief inspection will determine whether a
slider (or pull tab) is the locking or nonlocking
type. Always be certain that the pull tab is lifted
at right angles to the slider before attempting to
remove the locking type. The relative positions
of the pull tabs are shown in figure 10-20.
Interlocking Slide Fastener Tools
In addition to common tools such as
screwdrivers, pliers, awls, knives, scissors, and
needles, a well-equipped slide fastener kit should
be included in the parachute loft equipment.
The interlocking slide fastener kit (zipper
repair kit) contains all the parts necessary to repair
any size or type of interlocking slide fastener, plus
the following special tools: end cutters, or nippers,
used for removing stops and teeth; stop-closing
pliers, specially designed to span over the slider
and clamp the stops in position; and pull-up pliers,
designed to close the slider without a pull tab.
Another handy tool in slide fastener repair is an
awl with a bent tip. This tool maybe used to close
the chain by hand.
Interlocking Slide Fastener Repair
A torn or ripped interlocking slide fastener
bead cannot be repaired, but should be replaced
with a complete new interlocking slide fastener.
If the bead is damaged near the top or bottom
of the interlocking slide fastener, and the damaged
ends can be cut off to shorten the interlocking
slide fastener without hampering the usefulness
of the garment, an effective repair can be made.
Loose or missing teeth and stops can cause
trouble. If teeth or stops are not tightened, they
will eventually be lost and tear the bead. In
repairing such damage, see that the loose stop is
in position (almost touching teeth), and then set
tightly with stop-closing pliers. Set any loose teeth
parallel with the other teeth in the chain, and then
apply pressure with the stop-closing pliers. Set any
loose teeth parallel with the other teeth in the
chain and apply pressure with the stop-closing
pliers. If a replacement stop is not available in
the repair kit, a soft wire or heavy thread may
be used as a temporary stop.
A missing tooth should be repaired by
replacing the entire interlocking slide fastener.
However, in the event that there are no spare
fasteners available, a missing tooth may be
replaced. This is done by carefully removing the
stop from the top of the chain, taking off the top
tooth, replacing the stop, and setting the tooth
in place. (You should be careful not to damage
the bead of the chain when resetting the tooth.)
You may run into trouble in moving the slider
on the chain. This is caused by the jaws of the
slider being too tight, or a dirty chain maybe the
trouble. To loosen the slider, insert a screwdriver
between the jaws, and very gently pry them apart
until they operate freely.
Should the slider become jammed with fur,
wool, or other material, carefully remove such
matter with a pin or needle while gently pulling
the slider until it is released. If it is so badly
jammed that it resists all efforts, remove the slider
by carefully bending the jaws apart and returning
the jaws to their original position. Then replace
the slider on the chain (described later).
Most pull tabs have two small projections
fitting into slots on each side of the slider. To
remove the pull tab, use two pairs of pliers, one
on each side, and twist in opposite directions. In
10-17


