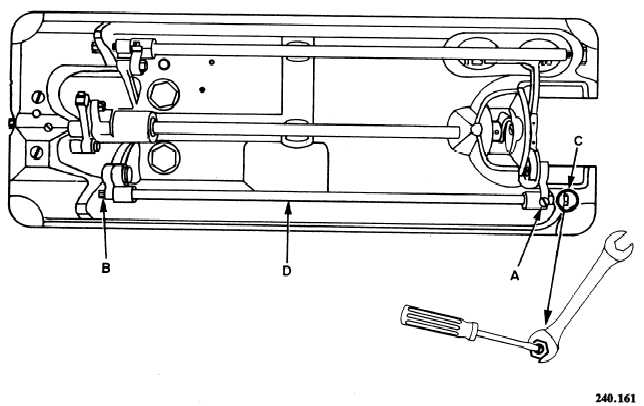
Centering the Feeding Action
Set the sewing machine to its maximum stitch
length. Loosen the feed-driving rockshaft crank
pinch screw (figure 4-18 [A]). Rotate the feed-
driving rockshaft (figure 4-18 [D]) so that the feed
dog’s movement is an equal distance from the
front and rear of the throat plate slots. After you
do this, retighten the feed-driving rockshaft crank
pinch screw.
Setting Side Play of Feed Dogs
Loosen the adjusting screw locknuts (figure
4-18 [B]). Adjust the feed-driving rockshaft
(figure 4-18 [D]) to center the side play of the feed
dogs by turning the adjusting screws (figure 4-18
[C]) left or right as needed; then retighten the
adjusting screw locknuts. Be sure the adjusting
screw locknuts hold the feed-driving rockshaft
snugly in place without binding.
Timing the Feed-Driving Eccentric
T i m i n g t h e f e e d - d r i v i n g e c c e n t r i c is
a c c o m p l i s h e d a s f o l l o w s : -
1. Set the stitch regulator to its lowest point.
This gives the operator the maximum stitch length
of 7 SPI.
2. Rotate the balance wheel toward the
operator until the feed dogs complete their
movement aft and before they begin to drop. At
this point the needle must be entering the material
being sewn. If this doesn’t occur, the following
trial-and-error sequence must be made:
Open the cover located on the rear of the
uprise. Rotate the balance wheel until the feed-
driving eccentric setscrew becomes visible (figure
4-19 [A]). Loosen this screw. Now place your
finger or a screwdriver on the feed-driving eccen-
tric to hold the eccentric in place, and rotate the
balance wheel a short distance. Retighten the
feed-driving eccentric setscrew. Continue this
procedure until the sewing machine complies with
step 2.
Setting the Presser Bar
Turn the balance wheel until the feed dogs are
just below the top of the throat plate. Loosen the
presser bar guide lever setscrew (figure 4-16 [C]).
Push the presser firmly against the throat plate,
aligning the slot between the toes of the presser
foot with the hole in the throat plate. Tighten the
presser bar guide lever setscrew. This completes
Figure 4-18.—Centering feeding action.
4-20


