Installing The CSU-15/P
Anti-g Garment Hose
This anti-g hose also must be cut to size, and
an end fitting installed after correct garment size
has been determined. To fit the anti-g hose,
proceed as follows:
Have the aircrew member don the anti-g
garment and sit in the aircraft. Attach the quick
disconnect on the hose to the aircraft supply
system. If the hose is too long, measure it and
mark where to cut it.
Lay the hose out flat. In a single operation,
cut the outer covering, inner hose, and
spacer/reinforcement at the mark. Sear
completely around the end of the outer cover to
prevent fraying.
Remove the tape, clamp, and severed portion
of hose from the quick-disconnect connector.
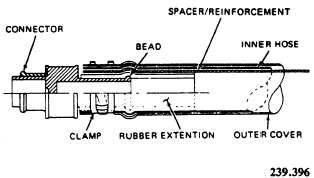
Position the spacer/reinforcement on the
rubber extension of the connector (fig. 4-12). Butt
the end against the raised portion of the
connector, and cover it with three turns of
electrical tape.
Slide the inner hose (bladder material) over the
connector and butt it against the raised portion
of the connector. Ensure the spacer/reinforcement
is not twisted. Secure it with three turns of tape.
NOTE: In some instances it may be
necessary to build up the outside diameter
of the hose area under the clamp with three
to six turns of tape to get the clamp tight.
Slide the outer cover of the hose over the inner
hose until it butts against the raised portion of
the connector. Install a clamp as shown in figure
4-12. Cover the clamp with three turns of tape
or a heat-shrinkable insulation sleeve.
Figure 4-12.-Assembly of hose and quick-disconnect fitting.
Finally, ensure that the fitting is properly
inserted in the hose, and clamp it properly
positioned between the raised bead and the body.
Ensure that the clamp is tightened sufficiently by
grasping the hose and fitting and jerking sharply.
Inspections
A preflight inspection is performed by the
aircrew member before each flight. The interval
between preflight inspections must not exceed 14
days. To perform the preflight inspection, do the
following:
l Check the slide fasteners for secure
attachment, ease of operation, and corrosion.
l Visually inspect all seams for loose or
broken stitching.
. Visually inspect outer shell and hose
covering for holes, tears, and abrasion.
. Check the quick-disconnect connector for
nicks, corrosion, and proper operation.
. Inspect the laces and lacer loops for secure
attachment and excessive wear.
If you find any discrepancies, forward the
garment to the aviator’s equipment branch for a
periodic inspection.
The calendar inspection is made by an
Aircrew Survival Equipmentman prior to placing
the anti-g garment in service and every 180 days
after that, which coincides with every second life
preserver calendar inspection. The calendar
inspection is also done whenever a discrepancy is
discovered during preflight inspection. This
inspection consists of the preflight inspection
items and the following additional tasks:
You will be required to perform a leak test and
repair any discrepancies found after you complete
the leakage test.
To perform the leakage test on a CSU-15/P
anti-g garment, you should use a special test
fixture, which inflates the suit and measures the
inside pressure. You are required to inflate the
g-suit to 5 psi. The bladder must not drop more
than 1.0 psig in 30 seconds. A pressure drop
greater than 1.0 psi in 30 seconds constitutes a
failure. The CSU-15/P anti-g garment remains in
service until it fails the leakage test.
If everything is in order, date and sign the
history card.
4 - 14