have blades that are straight and cutting edges that are
sharpened to an 85-degree angle. Snips like this can be
obtained in different sizes, ranging from the small,
6-inch, to the large, 14-inch, snip. Tin snips will also
work on slightly heavier gauges of soft metals, such as
aluminum alloys.
Snips will not remove any metal when a cut is
made. There is danger, though, of causing minute metal
fractures along the edges of the metal during the
shearing process. For this reason, it is better to cut just
outside the layout line. This procedure will allow you to
dress the cutting edge while keeping the material within
required dimensions.
Cutting extremely heavy gauge metal always
presents the possibility of springing the blades. Once
the blades are sprung, hand snips are useless. When
cutting heavy material, use the rear portion of the
blades. This procedure not only avoids the possibility
of springing the blades but also gives you greater
cutting leverage.
Many snips have small serrations (notches) on the
cutting edges of the blades. These serrations tend to
prevent the snips from slipping backwards when a cut is
being made. Although this feature does make the actual
cutting easier, it mars the edges of the metal slightly.
You can remove these small cutting marks if you allow
proper clearance for dressing the metal to size. There
are many other types of hand snips used for special
jobs, but the snips discussed here can be used for almost
any common type of work.
Cutting Sheet Metal with Snips
It is hard to cut circles or small arcs with straight
snips. There are snips especially designed for circular
cutting.
They
are
called
CIRCLE
SNIPS,
HAWKS-BILL SNIPS, TROJAN SNIPS, and AVIA-
TION SNIPS (fig. 1-9).
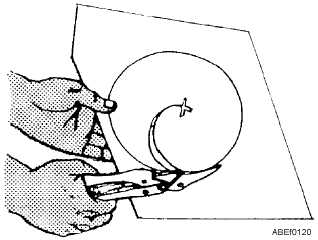
To cut large holes in the lighter gauges of sheet
metal, start the cut by punching or otherwise making a
hole in the center of the area to be cut out. With an
aviation snips, or some other narrow-bladed snips,
make a spiral cut from the starting hole out toward the
scribed circle, as shown in figure 1-10, and continue
cutting until the scrap falls away.
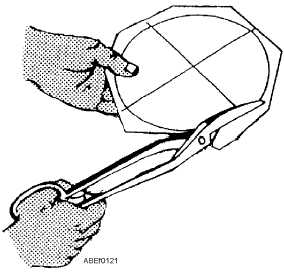
To cut a disk in the lighter gauges of sheet metal,
use a combination snips or a straight-blade snips, as
shown in figure 1-11. First, cut away any surplus
material outside the scribed circle, leaving only a
narrow piece to be removed by the final cut. Make the
final cut just outside the layout line. This will permit
you to see the scribed line while you are cutting and will
cause the scrap to curl up below the blade of the snips,
where it will be out of the way while the complete cut is
being made.
To make straight cuts, place the sheet metal on a
bench with the marked guideline over the edge of the
bench and hold the sheet down with one hand. With the
other hand, hold the snips so that the flat sides of the
blades are at right angles to the surface of the work. If
the blades are not at right angles to the surface of the
work, the edges of the cut will be slightly bent and
burred. The bench edge will also act as a guide when
you are cutting with the snips. The snips will force the
scrap metal down so that it does not interfere with
cutting. Any of the hand snips may be used for straight
cuts. When notches are too narrow to be cut out with a
pair of snips, make the side cuts with the snips and cut
the base of the notch with a cold chisel.
1-10
Figure 1-10.—Cutting an inside hole with snips.
Figure 1-11.—Cutting a disk out of sheet metal.