The lip or cutting edge of a drill is that part of the
point that actually cuts away the metal when drilling
a hole. It is ordinarily as sharp as the edge of a knife.
There is a cutting edge for each flute of the drill.
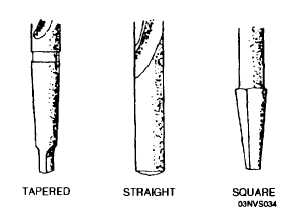
The shank is the part of the drill that fits into the
socket, spindle, or chuck of the drill press. Several
types exist (fig. 1-34).
The maintenance of twist drills and more about
how to use them on specific jobs are discussed later.
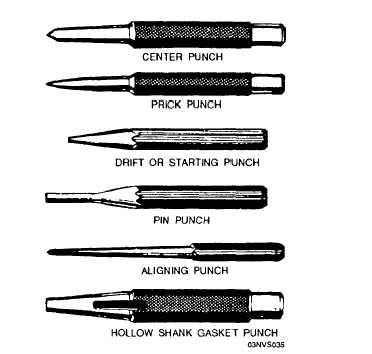
PUNCHES
A hand punch is a tool that is held in the hand
and struck on one end with a hammer. There are
many kinds of punches designed to do a variety of
jobs. Figure 1-35 shows several types of punches.
Most punches are made of tool steel. The part held in
the hand is usually octagonal in shape, or it may be
knurled. This prevents the tool from slipping around
in the hand.
The other end is shaped to do a
particular job.
When you use a punch, there are two things to
remember:
1. When you hit the punch, you do not want it
to slip sideways over your work.
2. You do not want the hammer to slip off the
punch and strike your fingers. You can eliminate both
of these troubles by holding the punch at right angles
to the work and striking the punch squarely with your
hammer.
Figure 1-34.-Representative shanks.
Figure 1-35.-Punches.
The center punch, as the name implies, is used for
marking the center of a hole to be drilled. If you try
to drill a hole without first punching the center, the
drill will “wander” or “walk away” from the desired
center.
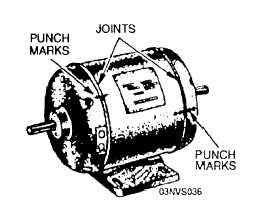
Another use of the center punch is to make
corresponding marks on two pieces of an assembly to
permit reassembling in the original positions. Before
taking a mechanism apart, make a pair of center
punchmarks in one or more places to help in
reassembly. To do this, select places, staggered as
shown in figure 1-36, where matching pieces are
joined. First, clean the places selected. Then, scribe
a line across the joint, and center punch the line on
both sides of the joint, with single and double marks
Figure 1-36.-Punch marking mating parts.
1-22