shank may be punched out with a drift punch. See
figure 13-48.
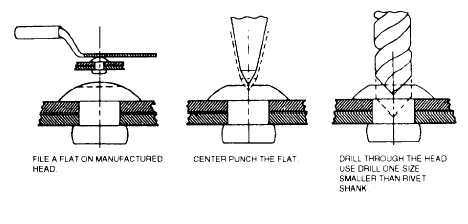
The removal of flush rivets requires slightly more
skill. If the formed head on the interior is accessible
and has been formed over heavy material, such as an
extruded member, the formed head can be drilled
through and sheared off. If the material is thin, it may
be necessary to drill completely through the shank of
the rivet, and then cut the formed head with
diagonal-cutting pliers.
The remainder of the rivet
may then be drifted out from the inside.
BLIND RIVET INSTALLATION
The description and use of blind rivets are
covered in chapter 2 of this manual. The special tools
and installation and removal methods are covered in
the following sections.
Selection of the proper
equipment depends on a number of variables: space
available for equipment, type of rivets to be driven,
and the availability of air pressure.
Installation Tools
One of the tools used for driving buck rivets is the
CP350 blind rivet pull tool. See figure 13-49. The
nose of the tool includes a set of chuck jaws that fit
the pull grooves in the rivet pinto pull it through the
rivet shank to drive the rivet. The nose also has an
outer anvil that bears against the outer part of the
manufactured head during the driving operation. The
third nose component is an inner anvil that advances
automatically to drive the locking collar home after
the blind head is formed. A short nose assembly,
interchangeable with the standard assembly, is
available for use in areas of restricted clearance.
A change in rivet diameter requires a change in
chuck jaws, outer anvil, inner anvil, and inner anvil
thrust bearing, and an adjustment of the shift valve
operating pressure. A change in the rivet head type
from universal head to countersunk head without a
change in rivet diameter, or vice versa, requires only a
change of the outer anvil.
A special chuck jaw assembly tool is furnished
with the tool. To insert the chuck jaws into the chuck
sleeve, you should mount the three jaws on this
assembly tool to form a cone.
Then lower the
inverted chuck sleeve over the jaws.
You should
always be sure that the pull tool is equipped with the
correct size chuck jaws, the outer and inner anvils fit
the rivets being driven, and the relief valve operating
Figure 13-48.—Removal of rivets.
13-30