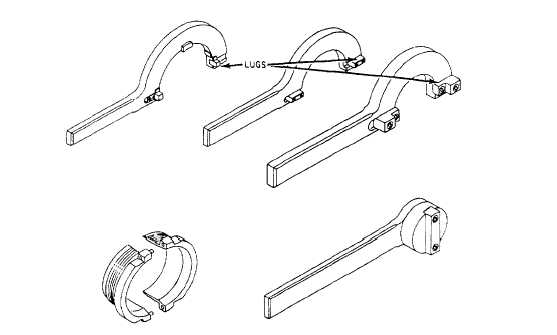
Figure 12-21.-Landing gear shock strut tools.
nut and reinflating the strut, the strut must be dis-
assembled and the packings replaced.
The tools shown in figure 12-21 are typical of the
tools used during disassembly and assembly of landing
gear shock struts. Normally, each tool is designed for,
and should be used only on, one type of installation.
When using wrenches, you must take care to maintain
the lugs of the wrenches in their respective positions.
Slippage of the wrench, when under torquing
conditions, may cause damage to aircraft parts, the tool,
or even injury to personnel. NEVER place extension
handles of any type on these tools to increase the applied
force.
These tools, like other special tools, should be kept
where they will not be subjected to rough handling,
which could cause mushroomed or deformed surfaces,
making them useless for aircraft repair. Shock strut
disassembly and replacement of packings is a
requirement for advancement to first class; therefore, it
is not covered in this training manual.
INTERMEDIATE MAINTENANCE REPAIR
AND SEAL REPLACEMENT
Repair of recoil struts at the intermediate level of
maintenance is restricted to seal replacement and
replacement of parts listed in the “Intermediate
Maintenance Section” of the aircraft MIM or the
appropriate 03 manual. The following paragraphs
provide information on the disassembly, cleaning,
inspection, parts replacement, reassembly, and bench
testing of a strut at the intermediate level.
Disassembly
Disassemble the
key index numbers
strut assembly in the order of the
assigned to the exploded view
illustration provided in the appropriate 03 series
accessories manual or the “Intermediate Maintenance
Section” of the applicable MIM.
WARNING
Before beginning disassembly, make sure
that all pressure has been exhausted from the
strut. Do not disassemble the inner and outer
cylinder until all the pressure has been
released from the strut. Disassembly of the
strut before releasing all pressure could lead
to serious personnel injury or loss of life.
Remove the complete air valve assembly by
breaking the lockwire and unscrewing the 3/4-inch hex
nut. Turn the strut over and drain the hydraulic fluid.
Disconnect the torque arms (scissors). Break the
lockwire and unscrew the packing nut at the bottom of
12-26