rotameter tube, it indicates a leak. If no leakage is indicated during this test, continue.
Return the leakage selector valve (F) to the HIGH position and turn the leakage on/off valve (G) to the OFF position. By slightly cracking the cap at the N2 input connection, you can bleed any pressure indicated on the N2 input pressure gage (27)
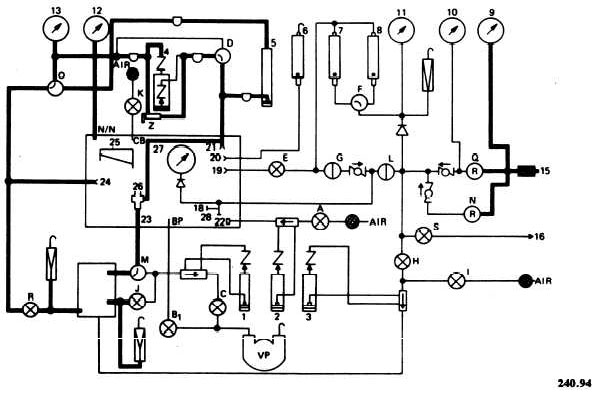
At this time, a line with two bayonet fittings must be attached between the low-pressure connection (19) and the 200-CCM leakage connection (20) inside the chamber. This line is used to check for any leakage through the leakage control valve (E). Leakage is indicated on the overboard rotameter (G). If no leakage is indicated, remove the side attached to the leakage connection (20) and attach it to the reference tap connection (21 ). (This sets your test stand up to perform the differential pressure system test.) The reference tap connection (21) is also located inside the chamber. Place a cap over the piezometer and turn the pressure selector valve (D) to the H2O position. Slowly open the leakage control valve (E) until the pressure/suction manometer (4) indicates 9.0 inches of water (in. H2O). Fully closing this valve (E) may be necessary after you reach 9.0 in. H2O. No leakage should be indicated on the high-range leakage rotameter (8).
Turn the leakage selector valve (F) to the LOW RANGE position. No leakage should be indicated on the low-range leakage rotameter (7). Close the leakage control valve (E) and turn the leakage selector valve (F) to the HIGH RANGE position. Now disconnect the line at the low-pressure connection (19). Bleed the pressure from the pressure/ suction manometer (4); then reconnect the lines.
If you find this system has no leakage, your test stand is set up to perform the differential pressure indicating system leakage test.
DIFFERENTIAL PRESSURE INDICATING SYSTEM
The schematic for the differential pressure indicating system is shown in figure 2-7. The purpose of this system is to sense the difference in pressure between the outlet of the component being tested and the surrounding atmosphere, whether at sea level or altitude. You use this system when you perform safety-pressure, pressure-breathing, and flow-suction tests. Three manometers on the test stand indicate differential pressure: the pressure/suction manometer (4), t h e H G m a n o m e t e r ( 5 ) , a n d t h e i n c l i n ed pressure/suction manometer (25).
With the pressure selector valve (D) in the H2O position, pressure or suction is sensed in the

Figure 2-7. - Model 1172AS100 differential pressure indicating system.
Continue Reading