Propeller Removal
It usually takes a crew of three to remove the
propeller and place it on the dolly. Refer to the
applicable maintenance instructions for a list of
tools and procedures used to remove the propeller
assembly. Cycle the propeller to maximum reverse
to aid in the removal of the afterbody assembly.
Maximum reverse is the only position that allows
afterbody removal without causing damage to the
afterbody or propeller blades. After you remove
the top and bottom sections, cycle the propeller
back to the feather position. Secure all electrical
power to the propeller. Disconnect the cannon
plugs and propeller control input linkage, and
stow them away to prevent snagging during
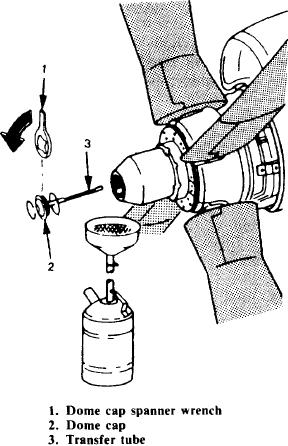
removal. Remove the propeller spinner. Remove
the dome cap and oil transfer tube. Position an
oil shield under the dome to catch oil spillage. See
figure 8-18.
CAUTION
The propeller should NOT be cycled for
at least 10 minutes before removing the
Figure 8-18.-Dome cap removal.
dome cap.
Unscrew the dome retaining nut and remove
Propeller Cleaning
the dome assembly. Remove the pitchlock
assembly with the puller. This assembly includes
If you disassemble the propeller, clean all the
the pitchlock control cam, pitchlock stationary
parts with approved cleaning solution except the
ring and pin, and externally splined spacer ring.
deicing brushes and slip rings. Thoroughly dry all
Install a dynamometer between the hoist and yoke
parts after cleaning. Vapor blasting is NOT
assembly.
permitted on this propeller. The use of rags or
paper for cleaning or wiping internal parts of the
NOTE: When removing or installing
propeller and control assembly is NOT permitted.
the propeller, do not turn the No. 1
The use of these materials may cause lint or
blade beyond positive 100 degrees or
minute particles to enter the hydraulic system.
minus 15 degrees. Movement passed these
Malfunctioning of parts is possible. Unused parts
limits will damage the propeller. Damage
or parts not reassembled within a reasonable time
occurs when the beta follow-up shaft
should be preserved with a corrosion-preventive
releases from the beta gear segment.
compound. Exact procedures for the cleaning and
Damage also occurs when the beta shaft
prevention of corrosion on propellers are found
moves into the control assembly beyond its
in the applicable maintenance instructions.
stops.
Propeller Installation
Remove the propeller and control assembly
Installation procedures are the reverse of
from the propeller shaft. Install them on a dolly,
removal. Before installing the propeller on the
and secure them before removing the hoist.
propeller shaft, install (or clean and inspect) the
Remove the rear cone from the engine shaft
torque retainer (drive bracket assembly) and the
and retain it with the propeller assembly. See
negative torque bracket assembly on the engine
figures 8-19 and 8-20.
8-20

