When the parent rack is ready to be loaded, position
When you have finished loading the weapon on the
the weapon and the handling and loading equipment
under the loading station. If applicable, prepare the
weapon for bomb hoist loading by installing a hoisting
sling on the bomb for single store hoisting. Then, you
can install the bomb hoist on the parent rack and attach
the hoist cable to the hoisting sling. Remove slack from
the cable by operating the hoist. (Remember, one person
is positioned at the front and one at the tail of the weapon
to steady it while it is being hoisted.) Remove the
tie-down straps that secure the weapon to the handling
equipment.
If applicable, install a manual hoisting bar for
manual loading by installing the HLU-256/E manual
hoisting bar in the fuze well. Then, remove the weapon
tie-down straps that secure the weapon to the handling
equipment.
Now, the bomb hoist can be used to load the weapon,
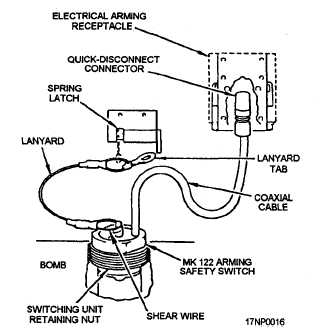
If you use an electric fuze, hoist the weapon to about
10 inches below the rack connect the Mk 122 arming
safety switch quick-disconnect connector (fig. 14-5) to
the parent rack arming receptacle. Then, continue to
hoist the weapon until both suspension lugs enter the
suspension hooks, and the hooks latch. Visually inspect
the hook lock indicators on parent racks for a hook
locked indication on each set of hooks being used. Slack
the hoist cable and shake the weapon gently to make sure
it is supported by the suspension hooks on the
IMER/ITERs lock safety stop levers.
Figure 14-5.—Mk 122 arming safety switch.
parent rack, remove the manual hoisting bar or the bomb
hoisting unit. Then you can adjust the sway braces by
taking the following actions:
NOTE: Unused sway braces should remain in
the full up position with the jam nuts tightened.
Adjust the sway brace adjusting screws until the
sway brace pads contact the weapon.
Simultaneously tighten the forward right and aft
left sway brace screws one-quarter turn with a suitable
wrench.
Simultaneously tighten the forward left and aft
right sway brace screws one-quarter turn.
NOTE: If all sway brace screws cannot be
tightened one-quarter turn on final tightening,
ensure the same amount of turn is applied to
each sway brace screw. The total tightening of
each sway brace screw should not exceed
one-half turn.
Tighten the jam nuts with a suitable wrench.
Next, you should adjust the ejector foot down until
it makes contact with the weapon. Then back off to the
first detent.
Then, if applicable, install the nose fuze or TDD.
Once fuzes are installed, you can install cartridges
in all loaded IMER/ITER breech chambers. Screw the
breech caps on all IMER/ITER breech chambers and
hand tighten the breech caps. Then, install cartridges
and tighten breech caps on parent rack. Verify that
unloaded IMER/ITER suspension hooks are open.
Place a WEAPON LOADED sign in the cockpit.
Remove tools and handling or loading equipment from
the area.
Weapons are loaded on an IMER/ITER in much the
same way as on a parent station. The major differences
are as follows:
After the weapon lugs have engaged the rack
suspension hooks, the safety stop lever must be
locked.
The ejector foot must be positioned down against
the weapon.
14-11