The gun should be adjusted so the rivet can be
driven in the shortest possible time, but you must take
care not to drive the rivet so hard or in such a manner
as to dimple the metal. Practice will enable you to
properly adjust a gun for any type of work.
The rivet should be pushed into proper position
and held there firmly, with the set of the rivet gun
resting squarely against the rivet head. The bucking
bar is held firmly and squarely against the protruding
rivet shank. (In most instances, the bucking bar must
be manipulated by another person, called the
“bucker.”) The gunner then exerts pressure on the
trigger and starts driving. The gun must be held
tightly against the rivet head, and it must not be
removed until the trigger has been released.
The bucker removes the bucking bar and checks
the upset head after the gunner has stopped driving. A
signal system is usually employed to develop the
necessary teamwork, and consists of tapping lightly
against the work.
One tap may mean “not fully
driven, hit it again”; two taps may mean “good rivet”;
three taps may mean “bad rivet, remove and drive
another. ”
The upset head, often referred to as the bucktail,
should be 1 1/2 times the original diameter of the
shank in width and 1/2 times the original diameter in
height, as shown in figure 13-46. If the head formed
is narrower and higher than the dimensions given,
more driving is necessary.
If it is wider and
shallower, it must be removed and replaced.
Rivet Removal
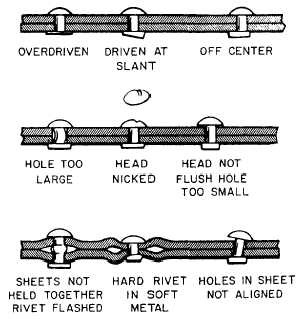
Rivets must be removed and replaced if they
show even the slightest deformity or lack of
alignment.
Reasons for replacing rivets are as
follows: rivet marred by bucking bar or rivet set;
rivet driven at slant or shank bent over; rivet too short,
causing the head to be shallow; rivet pancaked too flat
from overdriving; sheets spread apart and rivet
flashed between the sheets; two rivet heads not in
alignment; and head of countersunk rivet not flush
with outside surface or driven below surface.
Examples of these incorrectly driven rivets are shown
in figure 13-47.
When you are removing rivets, be careful not to
enlarge the rivet hole. This will require you to use a
larger size rivet for replacement. To remove a rivet,
file a flat surface on the manufactured head. It is
always preferable to work on the manufactured head
rather than on the one that is bucked, since the former
will always be more symmetrical about the shank.
Indent the center of the filed surface with a center
punch, and use a drill of slightly less than shank
diameter to drill through the rivet head. Remove the
drill and, with the other rivet end supported, pry or
lightly tap off the head with a drift punch. If the
shank is too tight after the removal of the head, the
shank should be drilled out. However, if the sheet
is firmly supported from the opposite side, the
Figure 13-46.—Rivet dimensions before and after bucking.
Figure 13-47.—Incorrectly driven rivets.
13-29


