Figure 2-25.—Reading sleeve and thimble scales of a
micrometer.
Figure 2-26.—Vernier scale of a micrometer.
READING THE VERNIER SCALE ON A
MICROMETER.— Many times you are required to
work to exceptionally precise dimensions. Under these
conditions it is better to use a micrometer that is
accurate to ten-thousandths of an inch. This degree of
accuracy is obtained by the addition of a vernier scale.
The vernier scale of a micrometer (fig. 2-26)
furnishes the fine readings between the lines on the
thimble rather than requiring you to estimate the
reading. The 10 spaces on the vernier are equivalent to
9 spaces on the thimble. Therefore, each unit on the
vernier scale is equal to 0.0009 inch, and the difference
between the sizes of the units on each scale is 0.0001
inch.
When a line on the thimble scale does not coincide
with the horizontal reference line on the sleeve, you can
determine the additional spaces beyond the readable
thimble mark by finding which vernier mark matches
up with a line on the thimble scale. Add this number,
as that many ten-thousandths of an inch, to the original
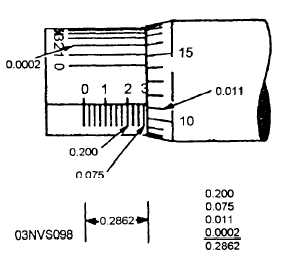
reading. In figure 2-27 see how the second line on the
vernier scale matches up with a line on the thimble
scale.
This means that the 0.011 mark on the thimble
scale has been advanced an additional 0.0002
beyond the horizontal sleeve line. When YOU add
this to the other
readings, the reading is
0.200 + 0.075 + 0.011 + 0.0002, or 0.2862, as shown.
Figure 2-27.—Reading a vernier state micrometer.
Inside Micrometer
The inside micrometer, as the name implies, is used
for measuring inside dimensions, such as pump casing
wearing rings, cylinder, bearing, and bushing wear.
Inside micrometers usually come in a set that includes
a micrometer head, various length spindles (or
extension rods) that are interchangeable, and a spacing
collar that is 0.500 inch in length. The spindles (or
extension rods) usually graduate in 1-inch increments of
range; for example, 1 to 2 inches, 2 to 3 inches (fig.
2-28).
2-10


