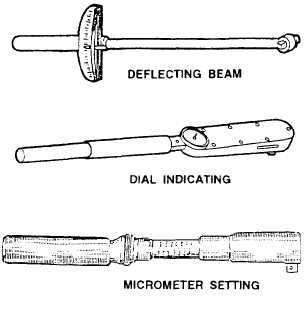
micrometer setting types (fig. 2-35). When using the
deflecting beam and the dial indicating torque
wrenches, the torque is read visually on a dial or scale
mounted on the handle of the wrench.
To use the micrometer setting type, unlock the
grip and adjust the handle to the desired setting on the
micrometer-type scale, then relock the grip. Install the
required socket or adapter to the square drive of the
handle. Place the wrench assembly on the nut or bolt
and pull in a clockwise direction with a smooth,
steady motion. (A fast or jerky motion will result in an
improperly torqued unit.) When the torque applied
reaches the torque value, indicated on the handle set-
ting, a signal mechanism will automatically issue an
audible click, and the handle will release or “break, ”
and move freely for a short distance. The release and
free travel are easily felt, so there is no doubt about
when the torquing process is complete.
Manufacturers’ and technical manuals generally
specify the amount of torque to be applied. To assure
getting the correct amount of torque on the fasteners,
it is important that you use the wrench properly ac-
cording to manufacturers’ instructions.
Use that torque wrench that will read about mid-
range for the amount of torque to be applied. BE
SURE THAT THE TORQUE WRENCH HAS BEEN
CALIBRATED BEFORE YOU USE IT. Remember,
too, that the accuracy of torque measuring depends a
lot on how the threads are cut and the cleanliness of
the threads. Make sure you inspect and clean the
Figure 2-35.—Torque wrenches.
threads. If the manufacturer specifies a thread lubri-
cant, it must be used to obtain the most accurate
torque reading. When using the deflecting beam or
dial indicating wrenches, hold the torque at the de-
sired value until the reading is steady.
Torque wrenches are delicate and expensive
tools. The following precautions should be observed
when using them:
1. When using the micrometer setting type, do not
move the setting handle below the lowest torque setting.
However, place it at its lowest setting before returning
it to storage.
2. Do not use the torque wrench to apply greater
amounts of torque than its rated capacity.
3. Do not use the torque wrench to break loose
bolts that have been previously tightened.
4. Do not drop the wrench. If dropped, the accu-
racy will be affected.
5. Do not apply a torque wrench to a nut that has
been tightened. Back off the nut one turn with a nontor-
que wrench and retighten to the correct torque with the
indicating torque wrench.
6. Calibration intervals have been established for
all torque tools used in the Navy. When a tool is cali-
brated by a qualified calibration activity at a shipyard,
tender, or repair ship, a label showing the next calibra-
tion due date is attached to the handle. This date should
be checked before a torque tool is used to ensure that it
is not overdue for calibration.
MICROMETERS
The type of micrometers commonly used are made
so the longest movement possible between the spindle
and the anvil is 1 inch. This movement is called the
range. For example, a 2-inch micrometer has a range
from 1 inch to 2 inches, and only measures work be-
tween 1 and 2 inches thick. Therefore, you must first
determine the approximate size, to the nearest inch, of
the piece to be measured and then select the proper size
micrometer. The size of a micrometer indicates the size
of the largest work it can measure.
Outside Micrometer
The nomenclature of an outside micrometer is
illustrated in figure 2-36.
2-24


