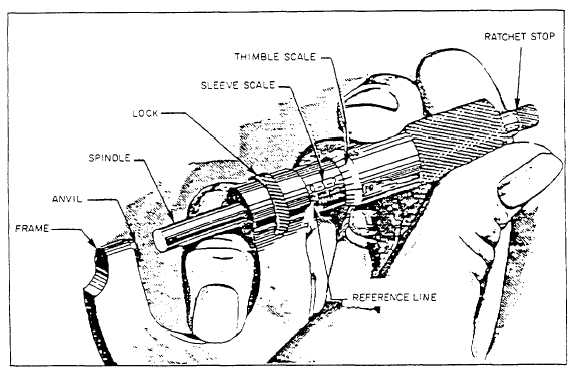
Figure 2-36.—Nomenclature of an outside micrometer.
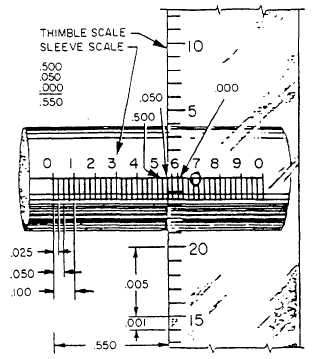
The sleeve and thimble scales of a micrometer
every time the thimble completes a revolution, the
(fig. 2-37) have been enlarged and laid out for demon-
strational purposes. To understand these scales you
need to know that the threaded section on the spindle,
which revolves, has 40 threads per inch. Therefore,
Figure 2-37.—Sleeve and thimble scales of a micrometer.
spindle advances or recedes 1/40 inch or 0.025 inch.
Note the horizontal line on the sleeve is divided
into 40 equal parts per inch. Every fourth graduation
is numbered 1, 2, 3, 4, and so on, representing 0.100
inch, 0.200 inch, and so on. When you turn the thim-
ble so its edge is over the first sleeve line past the 0 on
the thimble scale, the spindle has opened 0.025 inch.
If you turn the spindle to the second mark, it has
moved 0.025 inch plus 0.025 inch or 0.050 inch.
When the beveled edge of the thimble stops be-
tween graduated lines on the sleeve scale, you must
use the thimble scale to complete your reading. The
thimble scale is divided into 25 equal parts; each part
or mark represents 1/25 of a turn. And 1/25 of 0.025
inch equals 0.001 inch. Note in figure 2-37, every
fifth line on the thimble scale is marked 5, 10, 15, and
so on. The thimble scale permits you to take very
accurate readings to the thousandths of an inch.
The thimble is turned far enough to expose the 7
on the sleeve scale, but not far enough to expose the
first mark after the 7. Therefore, the measurement
must be between 0.700 inch and 0.725 inch. Exactly
how far between 0.700 inch and 0.725 inch must be
read on the thimble scale.
2-25


