material should be cut so it extends at least 2 inches on
either side of the gap and should be long enough to
provide one complete turn around the pipe with a pos-
sible overlap of about 2 inches. Secure the substitute
material with the chalk line.
2. Cut the woven roving cloth so it extends at least
4 inches beyond the edges of the bridge material. Im-
pregnate the cloth with the resin/hardener mixture.
Wrap the cloth around the bridge materials and tie it
securely as you did for the simple pipe patch.
3. Apply the PVC film and tie it securely with the
chalk line as you did for the simple pipe patch.
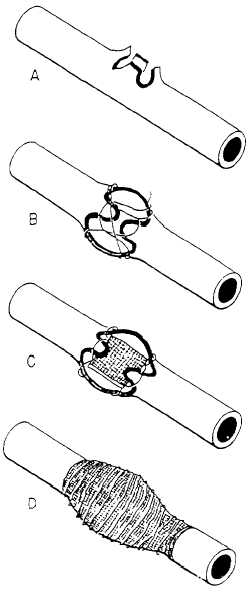
Corn pound Patch.— When you are making re-
pairs resulting from battle damage to piping systems,
the compound-type rupture, as shown in figure 2-29,
is the one you get most often. Since compound rup-
tures may take a variety of shapes, it becomes difficult
to select a single example to fit all repairs. In most
compound ruptures, it should be possible to simplify
the rupture by removing butterfly edges or by cutting
away the damaged section to form either a severed
pipe or a simple pipe repair. When the butterfly edges
or other projections cannot be removed by pounding
in, cutting, or burning, a simple pipe patch may be
applied with the following modifications:
1. Tie the chalk line firmly between the jagged
edges (view B of fig. 2-29) crisscrossing as much as
possible. This chalk line acts as a support for the woven
roving cloth and keeps it from falling into the void. No
void cover is used in this example as it would be
impractical to cut a void cover to suit the jagged edges
shown in view A of figure 2-29.
2. A small piece of impregnated woven roving
cloth (view C of fig. 2-29) is folded and laid in the void
where it helps to build up the mass and acts as an
insulator.
3. Apply the woven roving cloth (view D of fig.
2-29) cut to the appropriate length and width over the
small folded piece of woven roving cloth, and tie it
firmly as outlined previously for the simple pipe patch.
Flange Patch.— The flange patch (fig. 2-30) is
also applied similarly to the simple pipe patch, but it
has some modifications in the application procedure.
1. As illustrated in view B of figure 2-30, the void
cover is cut into an H shape, impregnated with the
resin-hardener mixture, inserted into the void, and tied
securely in place.
Figure 2-29.—Compound rupture patch, edges not
removed.
2. Four pieces of woven roving cloth are cut long
enough to make one complete turn around the pipe and
overlap 1 inch. These four pieces of woven roving cloth
are cut in an H shape, but the center pieces are not cut
away. Instead, they are folded up over the edges of the
flange.
3. Impregnate the separate pieces of woven roving
cloth with the resin-hardener mixture and place over the
rupture, as shown in view C of figure 2-30.
4. Apply the PVC film and tie down firmly, start-
ing at one end and working up to the flange. Make
several windings through the gap in the flange in the
2-20


