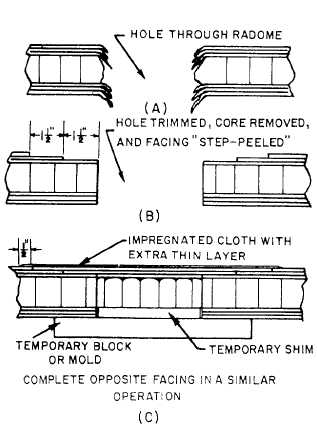
The individual plies are then cut out as shown in
figure 14-14. Each ply is “stepped” back 1 1/2 inches
and trimmed out by using a sharp knife. The sides of
the repair should be parallel with the weave of the
cloth, if possible.
NOTE: Do not cut through more than one
layer of cloth. If the layer of cloth underneath
is scratched, the strength of the repair will
suffer.
The opposite facing is shimmed and backed up
with a mold, and the core material is inserted as
previously described.
The outer repair plies are
soaked in the resin and laid over the damaged area.
An extra layer of thin cloth is laid over the repair area
to extend one-half inch over the undamaged facing.
The repair area is then covered with a sheet of
cellophane to apply pressure, and then it is allowed to
cure. The inner facing is then replaced in the same
manner as the outer facing. After the inner repair has
been cured, the entire repair area should be sanded to
the original contour and prepared for refinishing.
FOAM CORE.—When the puncture penetrates
the entire wall, remove the damaged core and face
Figure 14-14.—Stepped repair method.
laminates to one-fourth inch past the perimeter of the
hole on the inner face. Make a plaster support to
replace the removed core, conforming to the
curvature of the inside layer of the inner face.
Figure 14-15 shows a punctured repair with a plaster
support.
After repair to the inner face has been completed,
remove the plaster support and continue the repair on
the opposite side.
Finishing Repaired Areas
In the repair of reinforced plastic parts, the final
step is to refinish the part with a finish identical to the
original, or an acceptable substitute. In refinishing
radomes and other surfaces that enclose electronic
equipment, consult NAVAIR 01-1A-22. Do not use
metallic pigmented paints or other electronic
reflective-type materials because of undesirable
shielding and interference effects. Always use the
materials recommended in the applicable structural
repair manual for refinishing both the interior and
exterior surfaces of reinforced plastic components.
Reinforced plastic components whose frontal
areas are exposed to high speeds are frequently coated
with a rain erosion coating.
Rain erosion coatings
protect the component against pits that are caused by
raindrops hitting the component at high aircraft
speeds.
These pits or eroded areas can cause
delamination of the component glass cloths if allowed
to progress unchecked.
Rain erosion-resistant coatings for reinforced
plastic components conform to Specification
MIL-C-7439. Coatings that conform to this specifi-
cation are classified as Class I and Class II.
Class I is a rain erosion-resistant coating that is
furnished in kit form. This kit consists of a primer,
accelerator, diluting solvent, and neoprene.
Class II is a rain erosion-resistant coating with an
additional surface treatment to minimize radio noise
resulting from precipitation static on the coated
surface. This coating is also supplied in kit form and
consists of a primer, accelerator, diluting solvent,
neoprene, and antistatic coating.
These kits (MIL-C-7439, Classes I and II) are
packaged unaccelerated to provide longer shelf life.
The neoprene is ready to use only after the catalyst
(accelerator) has been added. The material in these
kits should be mixed and applied in accordance with
the instruction sheet supplied by the kit manufacturer.
14-12


