the penetrator end of the clamps. This makes it
practicable to use the tester on either the outside or inside
surface of tubing, as well as on many other applications
where the clearance above the penetrator or below the
anvil is limited. The indicator brackets are arranged so
that it is possible to turn the indicators to any angle for
greater convenience in a specific application, or to
facilitate its use by a left-handed operator. Adjustment
of the lower clamp is made by the small knurled knob
below the clamp. The larger diameter knob, extending
through the slot in the side of the clamp, is used for actual
clamping.
Each Riehle tester is supplied with a diamond pene-
trator and a 1/16-inch ball penetrator. The ball penetrator
should not be used on materials harder than B-100 nor
on a load heavier than 100 kilograms. This is to avoid
the danger of flattening the ball.
The diamond penetrator, when used with a
150-kilogram load, may be used on materials from the
hardest down to those giving a reading of C-20.
When the expected hardness of a material is
completely unknown to the operator, it is advisable to
take a preliminary reading on the A scale as a guide in
selecting the proper scale to be used.
Testing Procedure
The basic procedures for making a test with the
Riehle tester are as follows:
1. Apply a minor load of 10 kilograms.
2. Set the penetration indicator to zero.
3. Apply a major load of 60, 100, or 150 kilograms
(depending on the scale), and then reduce the load back
to the initial 10-kilogram load.
4. Read the hardness directly on the penetration
indicator.
The hardness reading is based on the measurement
of the additional increment of penetration produced by
applying a major load after an initial penetration has
been produced by the minor load. In reporting a
hardness number, the number must be prefixed by the
letter indicating the scale on which the reading was
obtained.
Removal and Replacement
of a Penetrator
The penetrator is retained in the tester by means of
a small knurled clamp screw extending from the top of
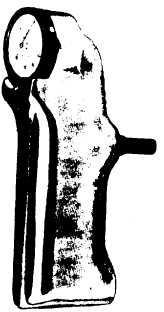
Figure 1-29.—Barcol portable hardness tester.
the upper clamp. To remove a penetrator, there should
beat least 2 or 3 inches of space between the upper and
lower clamps so that one hand can be placed underneath
the upper clamp to catch the penetrator when it is
released. Two or three turns of the clamp screw will
release the penetrator. The two contact pins that extend
through the penetrator on either side of the point are
retained in the tester when the penetrator is removed.
To replace a penetrator, it must be turned so that the
flat side faces the clamp screw, and the locating pin on
the penetrator is in line with the slot provided to take the
pin. The contact pins should be guided into their
respective holes through the penetrator. With the
penetrator in place, it should then be clamped securely
by turning the clamp screw. Before you make an actual
test, one or two preliminary tests should be made to
properly seat the penetrator.
BARCOL TESTER
The Barcol hardness tester, shown in figure 1-29, is
a portable unit designed for testing aluminum alloys,
copper, brass, and other relatively soft materials.
Approximate range of the tester is 25 to 100 Brinell. The
unit can be used in any position and in any space that
will allow for the operator’s hand. The hardness is
indicated on a dial conveniently divided in 100
graduations.
1-39


