239.236
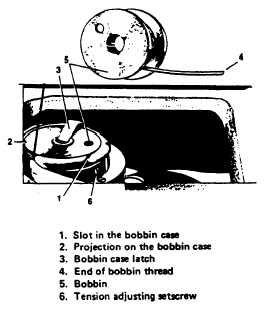
Figure 9-30.-Bobbin case threaded.
Winding the Bobbin
To wind the bobbin and adjust the bobbin
winder, follow the procedure given for the 31-15
sewing machine.
Replacing the Bobbin and Threading
the Bobbin Case
Hold the bobbin between the thumb and
forefinger of your right hand with the thread
drawn out on the bottom from left to right. Place
the bobbin on the center stud of the bobbin case;
then push down the latch.
Draw the thread into the slot (1), and under
the back of the projection (2). Leave a loose end
of thread about 2 inches long above the slide.
When closing the slide plate, leave just enough
space for the thread to pass through when it is
first picked up by the needle.
Regulating the Tension
The tension on the needle thread is regulated
by the tension thumb nut located at the front of
the tension disks on the front of the machine. To
increase the tension, turn this thumb nut
clockwise. To decrease the tension, turn the
thumb nut counterclockwise.
The tension on the bottom (bobbin) thread is
regulated by means of the small screw nearest the
center of the tension spring in the outside of the
bobbin case (l), as shown in figure 9-30. To
increase the tension, turn this screw clockwise. To
decrease the tension, turn the screw
counterclockwise.
Regulating the Length of Stitch
The number of stitches per inch is stamped on
the stitch indicating disk, which can be seen
through the hole on the uprise.
To change the length of stitch, press down the
feed regulating stud (plunger), located in the bed
of the machine. At the same time, turn the balance
wheel slowly until the plunger enters a notch in
the adjustable feed eccentric disk. Continue to
hold the plunger and turn the balance wheel
forward or backward until the number of stitches
per inch desired can be seen through the hole in
the front of the uprise. Disengage the plunger by
releasing it.
Regulating the Pressure
on the Material
The pressure on the material is regulated by
the presser bar regulating screw at the back of the
sewing machine. The screw acts on a flat spring.
To increase the pressure, turn this screw
downward. To decrease the pressure, turn this
screw upward. The pressure should be only heavy
enough to enable the feed to move evenly along
whatever thickness of material you are using.
Preparing for Sewing
With the left hand, hold the end of the needle
(machine) thread, leaving it slack from the hand
to the needle. Turn the balance wheel over toward
you until the needle moves down and up again
to its highest position. If the sewing machine is
properly timed, this will bring the bobbin thread
up with the machine thread through the hole in
the feed dog. Lay the threads back under the
presser foot and close the slide.
Place the material under the presser foot.
Lower the presser foot either by hand or by the
knee lift, and begin to sew. Start the sewing by
turning the balance wheel over toward you as you
depress the treadle.
Removing the Work
After the machine has stopped, move the
thread take-up lever to its highest position. Raise
9-25


