Vibrating Presser Foot. Holds the material
in place while the alternating presser foot rises to
239.282
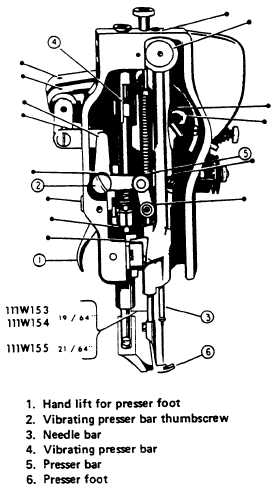
Figure 9-25B.—Class 111 sewing machine, side view
showing oiling points.
Needle Thread Lubricator. Lubrication of
the thread when sewing leather. Lubrication of
the thread prevents it from fraying, and prevents
the needle from becoming hot when sewing at high
speed.
Needle Thread Tension. Regulates the
tension on the needle thread so that the lockstitch
may be adjusted properly.
Needle Thread Controller Spring As-
sembly. Removes sufficient slack from the
needle thread when the needle is descend-
ing to prevent the needle from splitting the
thread.
Needle Bar. Holds the needle and carries
the thread to the rotary hook where the lockstitch
is formed.
make another stitch.
Lifting Presser Foot. Holds the material
in place while the vibrating presser foot and feed
dog go forward to get material for the next stitch.
The class 111 machine is a compound feed
machine. This means that the feed dog, vibrating
presser foot, and needle move together to feed the
material. Some class 111 machines are equipped
with a compound feed only, such as the 111 W
151; and others are equipped with a combination
of the compound feed and alternating presser foot
that holds the material while the needle and
vibrating presser foot are moving into position for
the next stitch, such as the 111 W 155.
Perhaps the description of the feed mechanism
gave you a hint that the class 111 sewing machine
is a more complicated machine than the class 31.
It is indeed.
Timing the 111 W Class
Sewing Machines
The first step in timing the 111 W machine is
to set the feed driving eccentric on zero stitches
per inch (0 spi). Set the needle bar. With the needle
bar in its lowest position (needle bar crank in the
horizontal position, the rounded portion on the
top and driving stud at the bottom), the
connecting link will be vertical. Set the needle bar
with the upper timing mark just visible at the base
of the needle bar rock frame, and tighten the
needle bar pinch screw. The needle bar is then
properly set.
To set a needle bar that has no mark, set the
feed eccentric for eight stitches to the inch. Then
set the needle bar so that when it rises 3/32 inch
from its lowest position and the point of the
sewing hook is at the center of the needle, the
needle eye will be about 1/16 inch below the hook
point.
The next step is to time the arm shaft with the
hook drive shaft. With the connection belt
removed, rotate the balance wheel toward the
operator until the thread take-up lever is at its
highest point, then aline the arrow on the hook
drive shaft collar with the timing plate arrow, and
replace the connection belt. Rotate the balance
wheel and check. The next step is to center the
feeding action. For this step the feed driving
eccentric must be set on zero spi. With the needle
entering the feed dog, center the needle in the hole
9-21