239.256A
Figure 10-29.—Baseball stitch (top view.
needle from the outside of the lower ply and bring
it out the center of the plies, forming a straight
overthrow stitch at the beginning of the seam, as
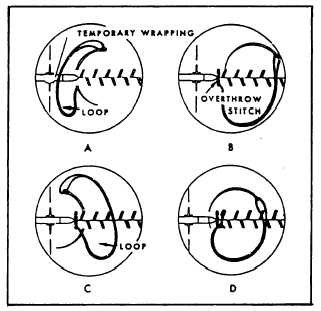
shown in view B of figure 10-28. Start the baseball
stitch by inserting the needle in the center of the
plies toward the outside of the opposite piece of
material, as shown in view C of figure 10-28.
Proceed with the baseball stitch along the folded
edges of the fabric (or the edges of the leather),
as shown in figure 10-29. Insert the needle from
the inside of the folded edges, only one-sixth inch
from the folded edge, as shown in views D, E,
and F of figure 10-28. Keep enough tension on
the thread to remove all loops and slack thread.
Do not apply too much tension because this tends
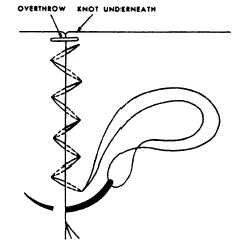
to pucker or draw the seam out of line. Every time
you sew 6 inches of the baseball stitch, make a
lock knot, as shown in figure 10-30. After the last
two stitches of the baseball stitch, finish with a
straight overthrow stitch and two half hitches.
Use of the Hand-sewn Hidden Stitch
and the Needle Used
The hidden stitch is usually used to make
repairs on upholstery and on clothing where good
appearance is important. To make this stitch,
select a 2 1/2-inch curved needle and a length of
suitable thread. Thread the needle to sew with a
single thread and tie a knot in the long end. Fold
under one-half inch of material and place it on
the other piece of material, as shown in figure
10-31. Start the stitch by pushing the needle
through the back of the fold, about one-eighth
239.256B
Figure 10-30.—Forming a lock knot for the baseball stitch.
inch from the end. Pull the needle through the
bottom material at a point directly below where
the needle came out of the fold. Guide the needle
so that the point comes out again about one-
fourth inch along the line of the seam. The point
should come out directly below the creased edge,
as shown in view A of figure 10-31. Pull the needle
and thread out to draw the stitch tight. Push the
needle into the front edge of the fold directly
above the point where the needle came out of the
bottom material. Guide the needle point along the
inside of the fold so that it again comes out the
creased edge about one-fourth inch from where
it entered, as shown in view B of figure 10-31. Pull
the stitch tight and repeat the previous steps until
the end is reached. Finish the seam off by coming
back one stitch (through the opposite material)
so that the needle reappears alongside the exposed
thread of the next-to-the-last stitch. Tie two half
hitches around the exposed thread.
MACHINE-SEWN SEAMS
Chances are you have been accomplishing
sewing projects since you arrived at your new
assignment. Then again, you may have done no
sewing at all. The amount of sewing done in your
shop depends upon the mission of your base. If
your unit does much fabrication, then you
probably will do quite a lot of machine sewing.
10-24