with the thimble on your fourth finger. Keep your
fourth finger about two-thirds bent. Three fingers
are needed to guide the needle accurately and
swiftly from right to left. Hold the material in
such a manner that you do not tire easily; crossing
your legs and resting the material on them is
helpful. Never point the needle outward at arm’s
length, because you may injure a passerby.
Purposes and Characteristics
of the Basting Stitch
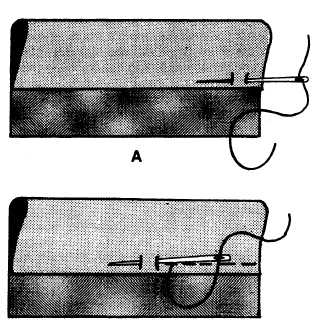
The basting stitch is used only for holding plies
of material together temporarily, before machine
sewing. This stitch is particularly helpful when you
install a patch to a flight suit or a cover. Basting
stitches are removed after making the machine
seam.
Two types of needles can be used for
basting-either the straight or the creed. Use the
curved needle for hard-to-get-at areas, such as
basting a patch on a cover; otherwise, the job can
be done with a straight needle. Make the basting
stitch as follows. Thread the needle with a
sufficient length of 16-4 thread, single or waxed.
Tie an overhand knot in the end of the single
thread. Turn under the material edge one-half
inch, unless specified otherwise in the technical
order. Make each stitch one-fourth inch in length
and one-eighth inch from the folded edge of the
material. At the end of the row of basting stitches,
lock the last stitch with two half hitches. Cut the
thread one-fourth inch from the knot. Figure
10-25 illustrates the formation of the basting
stitch.
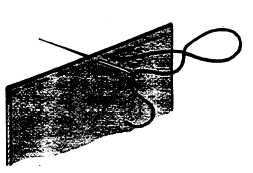
Hand Sewing the Running Stitch
You can use a running stitch as a substitute
for a machine-sewn seam. It is designed to be a
permanent stitch, when a sewing machine is not
available. Use a straight needle threaded with
single- or doubled-waxed cord or thread. Tie a
knot at the end of the cord. The material should
be turned under one-half inch. Insert the needle
inside the one-half inch fold of one ply and push
it through the three remaining plies so the starting
knot will be hidden. Continue sewing the pieces
together by using the basting stitch. When you
come to the end of the row, turn the material
around and go back in the opposite direction,
filling in the empty spaces as you sew, as shown
in figure 10-26. These two rows together become
the running stitch. Use four stitches per inch (each
stitch one-fourth inch long) and one-eighth inch
Figure 10-25.-Basting stitch.
from the folded
inches.
Keep enough
Figure 10-26.-Running stitch.
edge. Lock the seam every 6
tension on the thread to form
firm, well-set stitches. When you make the last
stitch, insert the needle through two piles and
bring it out in the center of the plies. Make two
half hitches around the stitch extending from the
second layer to the third layer of material.
Hand-sewn Overthrow Stitch
You use the overthrow stitch to attach metal
parts, such as cones and eyelet. For this type of
attachment, a sewing machine is not practical. The
overthrow stitch is also used for harness tackings.
A curved needle is used when the stitch can only
be sewn from one side of the fabric. Fold the
10-22