essential features include the power unit with a
push-button spray cap on the top and on the bottom, and
a screw lid that attaches to the container. A dip tube
extends from the bottom of the power unit into the
sealant. The power unit contains the propellant.
Air Regulators
The air regulator (transformer) is used to regulate
the amount of pressure to the spray gun and to clean the
air. The air delivered to the regulator always contains
some oil from the compressor, some water caused by
condensation, and many particles of dirt and dust.
Air regulators are equipped with a pressure valve
and pressure regulating screw to regulate the pressure
delivered to the spray gun. They also prevent pressure
fluctuations. The air must pass through a sack or
cleaner before it leaves the regulator. This cleaner is
contained in the long cylindrical part of the regulator
and should be drained daily. Air regulators are also
equipped with two gauges. One shows the pressure on
the main line while the other shows the pressure to the
spray gun.
SPRAY GUN TECHNIQUE
Proper spray gun technique reflects knowledge of
the equipment and experience. The spray gun should be
held so the spray is perpendicular to the area to which
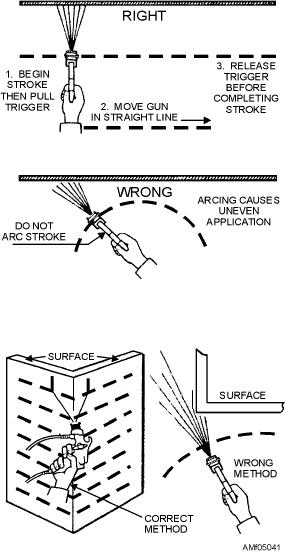
Figure 5-41.--Correct and incorrect methods of spraying.
the finish is being applied. You should ensure that the
perpendicular to the surface. Avoid pivoting and
prescribed gun-to-work distance is maintained.
circular movements of the wrist or forearm. These may
A distance of 6 to 10 inches from the gun to the
bring the gun closer to the surface.
work should be maintained when you are spraying
It is important to trigger the gun in order to avoid an
epoxy-polyamide and polyurethane finishes. The gun
uneven coat at the beginning and end of a stroke.
should be held 8 to 10 inches from the work for lacquer
Triggering is the technique of starting the gun moving
and 6 to 8 inches for enamels. For a narrow pattern, the
toward the area to be sprayed before the trigger is pulled
gun is held at the farther distances (10 inches for
and continuing the motion of the gun after the trigger
epoxy-polyamide and polyurethane, 10 inches for
has been released.
lacquer, and 8 inches for enamels).
You should avoid too much overlapping on each
A distance of less than 6 inches is undesirable
pass of the gun because an uneven coat will result. The
because the paint will not atomize properly, and an
rate of the stroke should produce a full, wet, even coat.
orange peel will result. A distance of more than
Once the job is started, it must be completed without
10 inches is equally undesirable. Dried particles of
stopping.
paint will strike the surface and cause dusting of the
finish. Examples of correct and incorrect spray gun
Spray Gun Adjustments
techniques are shown in figure 5-41.
The distance the spray gun is held from the work is
Figure 5-42 shows the principal parts of a typical
important; however, there are other factors to consider.
spray gun. The spreader adjustment dial is used to
The manner in which the gun is held and operated is
adjust the width of the spray pattern. When you turn the
also important. See figure 5-41. You should move your
dial to the right, a round pattern is obtained. When you
arm and body with the gun to keep the spray
turn to the left, a fan-shaped pattern results.
5-36

