signature appears in the correct quadrants of the
OPERATION OF PANEL FEATURES. --
CRT display.
The following section explains how to use the
The ALT mode is a useful feature of the 2000.
front and back panel features.
It lets you compare a known good device with a
Turn the Power/Intensity knob clockwise. The
device of unknown quality. In this test mode, you
2000 comes on with the LEDs for power,
use common test leads to connect two equivalent
channel A, 50/60 Hz, low range, and pulse/DC
illuminated.
points on the boards to the common test terminal.
The ALT mode of the 2000 allows you to
Focusing the 2000 display is an important part
automatically switch back and forth between
of analyzing the test signatures. First you adjust
channel A and channel B, so you can easily
the intensity control to a comfortable level. Then,
adjust the focus control (back panel) for the
compare two devices. You may also compare the
same points on two circuit boards. Select the ALT
narrowest possible trace.
mode by pressing the ALT button on the front
Aligning the trace is important in determining
panel. You may vary the alternation frequency
which quadrants the portions of a signature are
by using the RATE control.
in. With a short circuit on channel A, adjust the
trace rotation control until the trace is parallel to
NOTE: The black probe plugs into the
the vertical axis. Adjust the horizontal control
until the vertical trace is even with the vertical axis.
channel B test terminal.
Open channel A, and adjust the vertical control
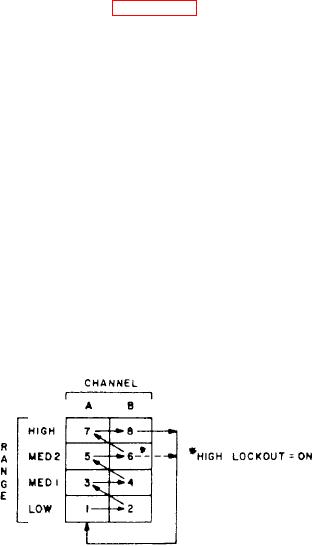
When using the alternate and auto features
until the horizontal trace is even with the
horizontal axis. Once set, you should not have to
simultaneously, each channel is displayed before
readjust these settings during normal operation.
the range changes. Figure 2-31 shows the sequence
of these changes.
Range Selection. --The 2000 has four im-
Frequency Selection. --The 2000 has three test
pedance ranges--low, medium 1, medium 2, and
signal frequencies--50/60 Hz, 400 Hz and 2000
high. You select these ranges by pressing the
appropriate button on the front panel. Start with
Hz. You can select these by pressing the
appropriate button on the front panel. In most
one of the medium ranges, i.e., medium 1 or
cases, you should start with the 50/60 Hz test
medium 2. If the signature on the CRT display
signal. Use the other two frequencies to view small
is close to an open (horizontal trace), select the
next higher range for a more descriptive signature.
amounts of capacitance or large amounts of
If the signature is close to a short (vertical trace),
select the next lower range.
Pulse Generator. --The built-in pulse
The High Lockout feature, when activated,
prevents the instrument from entering the high
generator of the 2000 allows dynamic, in-circuit
range. This feature works in either the manual or
testing of certain devices in their active mode. In
auto mode.
addition to using the red and black probes, you
The auto feature scans through the four
use the pulse generator. The output of the pulse
ranges--three with the HIGH LOCKOUT acti-
generator connects to the control input of the
vated at a speed set by the RATE control. This
feature allows you to see the signature of a
part in different ranges while freeing your hands
to hold the test leads.
Channel Selection. --There are two channels
on the 2000-channel A and channel B. You select
a channel by pressing the appropriate front panel
button. When using a single channel, plug the
red probe into the corresponding channel test
terminal. Plug the black probe into the common
test terminal. When testing, connect the red probe
to the positive terminal of the device; i.e., anode,
+V, etc. Connect the black probe to the negative
207X
terminal of the device; i.e., cathode, ground, etc.
Figure 2-31.-Auto/alternate sequence.
Following this procedure should assure that the
2-52

