duct sections, as illustrated in figure 3-7, the gap
between the duct ends should be 1/8 inch
minimum to 3/4 inch maximum. When install-
ing the clamps on the connection, the clamp
should be 1/4 inch minimum from the end of the
connector. Misalignment between the ducting
ends should not exceed 1/8 inch maximum.
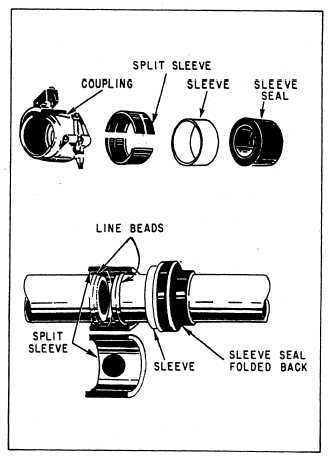
When installing flexible line connectors, such
as the one illustrated in figure 3-8, follow the steps
listed below to assure proper installation and
security:
1.
2.
3.
4.
5.
Fold back half of the sleeve seal and slip
it onto the sleeve.
Slide the sleeve (with the sleeve seal
partially installed) onto the line.
Position the split sleeves over the line
beads.
Slide the sleeve over the split sleeves and
fold over the sleeve seal so that it covers the
entire sleeve.
Install the coupling over the sleeve seal and
torque to correct value.
NOTE: Torque values for the various sizes
and types of couplings maybe found by referring
to the applicable MIM. Some couplings will have
the correct torque value marked on the outside
of the band.
When installing rigid line couplings, follow
the steps listed below and illustrated in fig-
ure 3-9:
1. Slip the V-band coupling over the flanged
tube.
2. Place a gasket into one flange. One quick
rotary motion assures positive seating of the
gasket.
3. Hold the gasket in place with one hand
while the mating flanged tube is assembled into
the gasket with a series of vertical and horizontal
motions to assure the seating of the mating flange
to the gasket.
NOTE: View B of figure 3-9 illustrates the
proper fitting and connecting of a rigid line
Figure 3-8.—Installation of flexible line connectors.
coupling, using a metal gasket between the
ducting flanges.
4. While holding the joint firmly with one
hand, install the V-band coupling over the two
flanges.
5. Press the coupling tightly around the
flanges with one hand while engaging the latch.
6. Tighten the coupling firmly with a ratchet
wrench. Tap the outer periphery of the coupling
with a plastic mallet to assure proper alignment
of the flanges in the coupling. This will seat the
sealing edges of the flanges in the gasket. Tighten
again, making sure the recommended torque is
not exceeded.
7. Check the torque of the coupling with a
torque wrench and tighten until the specified
torque is obtained.
3-10


