239.273
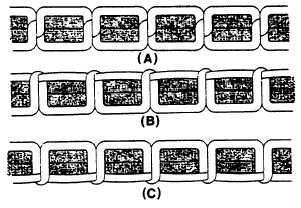
Figure 9-16.—Properly and improperly adjusted tensions.
For ordinary stitching, the needle and bobbin
threads should be locked in the center of the
thickness of the material, as shown in figure 9-16,
view A. When adjusting the tensions, you will not
have a cross section of the stitch.
If the tension on the needle thread is too tight,
or if the bobbin tension is too loose, the thread
will lie straight along the upper surface of the
material and appear as small loops, as shown in
figure 9-16, view B.
If the tension on the bobbin thread is too tight,
or if tension on the needle thread is too loose, the
bobbin thread will lie straight along the underside
of the material, as shown in figure 9-16, view C.
Regulating the Length of a Stitch
The length of a stitch can be checked at the
time the tension of the stitch is checked, as a trial
run of stitches is necessary during both
procedures.
The length of a stitch is regulated by the
thumbscrew in the slot on the front of the uprise
of the machine. To LENGTHEN the stitch,
loosen the thumbscrew and move the lever
DOWN. To SHORTEN the stitch, loosen the
thumbscrew and move the lever UP. When the
desired length of stitch has been obtained by test
running the machine on scrap material, tighten
the thumbscrew.
Regulating the Pressure on the Material
Pressure on the
pressure-regulating
material is regulated by the
thumbscrew on top of the
machine face. To increase the pressure, turn the
thumbscrew clockwise. The pressure should be
just heavy enough to enable the feed dog to move
the work along evenly.
Removing Work
Hand-turn the balance wheel toward you until
the thread take-up lever is at its highest position.
Raise the presser foot, either by the hand lever
or by the knee lift, and draw the work and threads
straight behind the presser foot. Cut the threads
close to the material, leaving free about 2 inches
of bobbin and machine thread.
Adjusting the Thread Take-up Spring
The thread take-up spring (fig. 9-15) should
be set so that when the eye of the needle reaches
the material on the downward stroke of the needle
bar, the spring will be through acting on the
thread, and will rest against the stop of the thread
take-up spring regulator.
If the thread take-up spring is not correctly
set, loosen the setscrew (2) in the arm of the
machine and turn the tension adjusting stud to
the right for more movement of the spring, or to
the left for less movement. When the spring is
correctly set, retighten the setscrew.
The tension on the thread take-up spring
should be just sufficient to take up the slack of
the needle thread until the eye of the needle
reaches the material on its descent. To increase
the tension on the thread take-up spring, loosen
the tension adjusting stud and move the take-up
spring from the recess in the regulator to the right
between the regulator and the tension disks. When
the required tension is obtained, securely tighten
the tension adjusting stud and move the spring
back into its position in the regulator recess. To
decrease the tension, move the spring to the left
between the regulator and the tension disks.
SINGER SEWING MACHINE 7-33
The class 7-33 sewing machine is a lockstitch
heavy duty machine, and is intended for use in
sewing heavy canvas, webbings, and other
material not adaptable to the lighter duty sewing
machines. The only difference between the 7-31
and the 7-33 is that the 7-33 has the clutch on the
motor, while the 7-31 has the clutch on the balance
wheel. The operation and maintenance techniques
are identical. The procedure for operating the 7-33
sewing machine is the same as for the 31-15 sewing
machine.
9-13


