
desired, and it is only to be used for sealing holes of 1
square inch or less in external surfaces. The damaged
area (1) should be cut out to a smooth circular or
rectangular shape. A 3/8-inch minimum radius (2) must
be provided at the corners of rectangular cutouts.
NOTE: This information applies to all repairs
made to balsa wood core panels. In cutting out the
damaged area, you must take care not to separate the
metal faces from the core. You can accomplish this by
using a very fine-toothed coping or hacksaw blade for
straight cuts, and cylindrical saws (hole saws) for
cutting holes or rounding corners.
After the damaged section has been cut out, file the
edges smooth by using a fine cut file only. Then, inspect
the area (3) for separation of the skin facing from the
balsa wood core. If the facing has separated from the
core, rebond the two surfaces, using the procedures
outlined in the previous section on skin separation.
Then, complete the repair by using the approved filler
material and two fabric patches, as shown in views (4)
and (5) of figure 5-17.
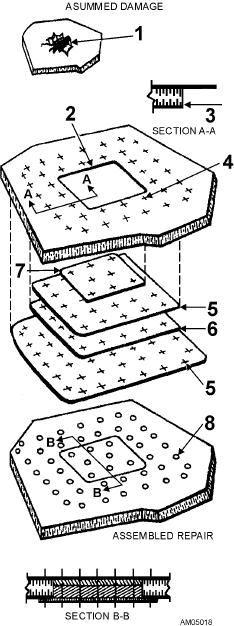
Figure 5-18 shows one flush-type balsa wood core
repair that is used on puncture damages larger than 1
inch. To make this type of repair, cut out the damaged
area (1) as previously described. After the damaged
area has been cut out (2), cut back the inner metal face 1
inch and remove the core material. See view (3) of
figure 5-18.
Inspect for adhesion of the face to the core, and
seal the exposed filler material to prevent the entry
of moisture. Lay out the required rivet pattern
and drill pilot holes in the panel. See view (4) of figure
Figure 5-18.--Balsa wood repair with flush patch.
5-18.
NOTE: The rivet size, rivet spacing, and number of
All pilot holes are then size drilled and machine or
rows of rivets are given in the appropriate repair section
press countersunk, as applicable. Complete the repair
of the applicable structural repair manual.
by installing the specified rivets. See view (8) of figure
5-18.
Next, prepare two patch plates; a wood, plywood,
or phenolic filler; and a metal filler. See views (5), (6),
When aerodynamic smoothness is not desired, a
and (7) of figure 5-18. The outer patch plate should fill
nonflush patch such as the one shown in figure 5-19 can
the hole in the core, and the inner patch plate should
be used. Notice that this type of repair uses two patch
overlap the hole in the core approximately 1 inch for
plates, a wood filler, and nonflush rivets. Otherwise, the
each row of rivets.
procedures described for the repair shown in figure
5-18 are applicable to this type of repair.
Locate the patch plates and wood filler. Using the
pilot holes in the panel as a guide, drill pilot holes
Repairing the Trailing Edge of an Airfoil
through the patch plates and wood filler. The patch
plates and wood filler are then bonded to the panel
A trailing edge is the rearmost edge of an airfoil
using the specified adhesive. Next, locate the metal
(wing, flap, rudder, elevator, etc.). It may be a formed or
filler, and drill pilot holes through both patch plates and
machined metal strip or possibly a metal-covered
the wood filler.
honeycomb or balsa wood core material that forms the
5-14