The simple hand bender shown in figure 6-10
uses two handles as levers to provide the mechanical
advantage necessary to bend the tubing, while the
mechanical operated tube bender employs a hand
crank and gears. The forming die is keyed to the drive
gear and secured by a screw (fig. 6-11).
The forming die on the mechanical tube bender is
calibrated in degrees similar to the radius block of the
hand-type bender.
A length of replacement tubing
may be bent to a specified number of degrees or it
may be bent to duplicate the bend in the damaged tube
or pattern. Duplicating the bend of a damaged tube or
pattern is accomplished by laying the pattern on top of
the tube being bent and slowly bending the new tube
to the required bend.
NOTE: Certain types of tubing are more
elastic than others. It may be necessary to
bend the tube past the required bend to allow
for springback.
Before bending aluminum alloy tubing, it should
be packed with fusible alloy Federal Specification
QQ-F-838. In an emergency, when aluminum alloy
QQ-F-838 is not available, aluminum alloy tubing
may be packed with shot or sand and both ends closed
with protective closures before bending. Where sand
or fusible alloy is used, wash or blow out all particles
after the tubing has been bent. Particles of aluminum
alloy or sand can cause serious damage to component
parts.
TUBE JOINT PREPARATION
The two major tube joints are the flared fittings
and flareless fittings. Preparation for these tube joints
differ.
Flared Fitting
There are two types of flared tubing joints—the
single-flared joint and the double-flared joint. The
single-flared tube joint is used on all sizes of steel
tubing and 5052 aluminum alloy tubing that conforms
to Federal Specification WW-T-700/6 with 1/2 inch or
larger outside diameter,
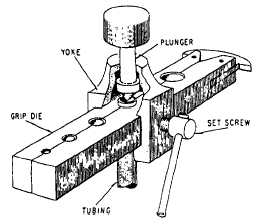
Use the tube flaring tool
(fig. 6-12) to prepare tube ends for flaring. Check
tube ends for roundness, square cut, cleanliness, and
no draw marks or scratches. Draw marks can spread
and split the tube when it is flared. Use a deburring
tool to remove burrs from the inside and outside of the
tubing. Remove filings, chips, and grit from inside
the tube. Clean the tube. Slip the fitting nut and
sleeve onto the tube. Place the tube into the proper
size hole in the grip die. Make sure the end of the
tube extends 1/64 inch above the surface of the grip
die. Center the plunger over the end of the tube and
Figure 6-12.—Tube flaring toot (single-flare).
tighten the yoke setscrew to secure the tube in the grip
die and hold the yoke in place. Strike the top of the
plunger several light blows with a hammer or mallet,
turning the plunger a half turn after each blow.
Loosen the setscrew and remove the tube from the
grip die.
Check to make sure that no cracks are
evident and that the flared end of the tube is no larger
than the largest diameter of the sleeve being used.
The double-flare tube joint is used on all 5052
aluminum alloy tubes with less than 1/2-inch outside
diameter, except when used with NAS 590 series tube
fittings and NAS 591 connectors or NAS 593 con-
nectors. Aluminum alloy tubing used in low-pressure
oxygen systems or corrosion-resistant steel used in
brake systems must be double flared. Double flare
reduces the chance of cutting the flare by
overtightening. When fabricating oxygen lines, make
sure that all tube material and tools are kept free of oil
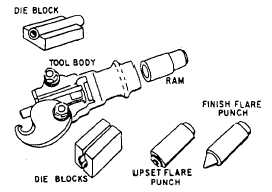
and grease. Use the tube flaring tool (fig. 6-13) to
prepare tube ends.
Check tube end for roundness,
square cut, cleanliness, and make sure there are no
draw marks or scratches. Draw marks can split the
tubing when it is flared.
Figure 6-13.—Tube flaring tool (double-flare).
6-11


