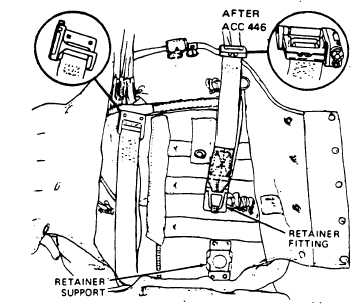
Figure 3-26.—Rotate risers.
ATTACHMENT OF CONTAINER
ASSEMBLY TO RISER ASSEMBLY
follows
To attach the container assembly to the riser
assembly, you must remove the tension strap from
the canopy peak, and remove the tension hooks
from the connector links and the packing table.
Rotate the risers onto the container, and secure
the riser retainer fittings to the riser retainer
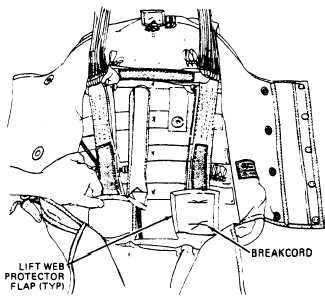
supports (fig. 3-26). Now, position the lift web
protector flaps over the riser and install the break
cords. These two break cords, approximately 2
inches apart, are constructed with one turn of
waxed size FF nylon thread, doubled. Pass the
threads through the protector flap, under a
support, up through the protector flap, and tie
them snugly with a surgeon’s knot followed by
a square knot, as shown in figure 3-27. Repeat
this procedure for the other riser.
INSTALLATION OF CONNECTOR
LINK TIES
The connector link ties are a very important
part of the rigging of the NES-12 and other
parachutes that use the ballistic spreading gun.
Not only do they prevent the risers from moving
around inside of the container, they also prevent
the premature deployment of the risers (riser
blowout), which could cause line entanglement or
premature firing of the spreader gun and provide
an anchor point for the firing of the spreader gun.
Figure 3-27.—Installing break cords.
To install connector link ties, proceed as
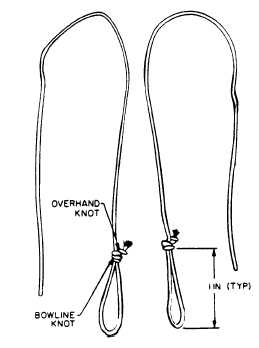
Cut two 12-inch lengths of 100-pound nylon
cord and sear the ends. (Do not use waxed cord).
Then, form a 1-inch loop in one end of each of the
cords and secure with a bowline knot. Tie an over-
hand backup knot in the end of the cord (fig. 3-28).
Figure 3-28.—Connector link ties.
3-12


