Bobbin and Bobbin Case
The procedure for removing the bobbin case,
winding the bobbin, threading the bobbin case,
and replacing the bobbin case is the same as for
the 31-15 sewing machine. The only exception to
this is that when the bobbin case is threaded, the
thread should be drawn from the BOTTOM from
left to right, instead of from the top as given for
the 31-15.
Threading the Needle
These machines are threaded in the same way
as the 111 series machines, described earlier in the
chapter. When threaded up to the needle, thread
the needle from the front through the eye to the
back. The long thread groove should be in front
when the needle is properly set in the needle bar.
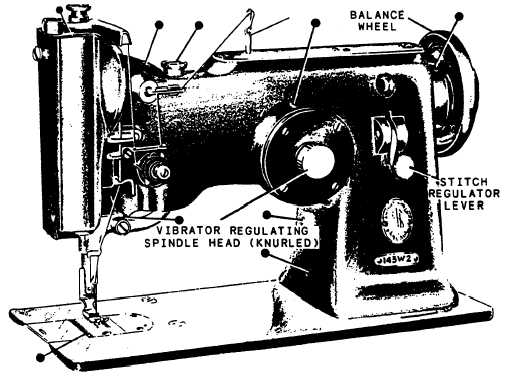
Regulating the Length of Stitch
To adjust the length of stitch, depress the
stitch regulator lever (fig. 9-39) on the uprise and,
at the same time, turn the balance wheel forward
until the lever engages in the notch in the stitch
regulator flange. Hold the lever in the notch and
turn the balance wheel backward or forward (as
necessary) until the desired number of stitches per
inch is shown opposite the arrow on the stitch
regulator.
Regulating the Width of the Zigzag
The extreme width of the zigzag (needle throw)
on the 143 W 2 is 3/16 inch; it is 5/16 inch on
the 143 W 3. The width of bight is regulated by
turning the knurled knob on the needle vibrator
regulating spindle head (fig. 9-39) at the front of
the machine. To increase the width of the stitch,
turn the regulating spindle head to the left, and
to the right to decrease.
Setting the Needle Bar
The two adjustment marks on the needle bar
are 3/32 inch apart. To set, insert the needle bar
up into the needle bar frame so the upper mark is
just visible at the lower end of the needle bar
frame with the bar at its lowest position. The eye
of the needle should be 1/16 inch below the point
239.293
Figure 9-39.—Oiling points at the front of the 143 W 2.
9-31