239.455
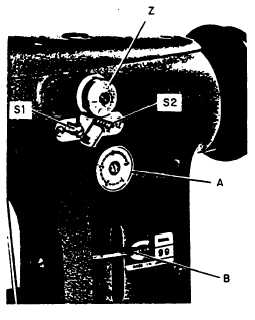
Figure 9—46.-Stitch regulator.
Stitch Regulator and Reverse
Sewing and Tacking
For reverse sewing and tacking, proceed as
follows:
1. When the number 1 on dial A of figure 9-46
is set uppermost on a vertical line, the feeder does
not move the material.
2. When the dial (A) is turned counter-
clockwise and lever (B) is raised as far as it will
go, the machine makes forward stitches, in-
creasing in size as the dial knob is turned toward
the larger numbers.
3. For reverse sewing, lower the lever (B) as
far as it will go.
4. By moving the lever up and down during
sewing, you can easily make forward or reverse
stitches continuously and at will. You can make
use of this feature for locking the thread at the
start or end of seams.
Straight and Zigzag Sewing
Be sure that stops S1 and S2 are set at the
extreme ends of their slot. If not, use a screwdriver
to loosen them about one turn, and then tighten
them in their extreme positions. Turning the
zigzag regulating knob Z clockwise as far as it will
go causes the machine to sew with a straight stitch.
Turning this knob counterclockwise produces a
zigzag stitch. The zigzag becomes wider the more
this knob is turned in a counterclockwise direc-
tion. The widest zigzag stitch is sewn when knob Z
cannot be turned any further. This occurs when
the pointer at the underside of knob Z points at
the largest number on the dial and is stopped by
stop S2.
When you want to control the width of the
zigzag between certain minimum and maximum
limits between the numbers on the dial, use a
screwdriver to set stops S1 and S2 to the selected
widths. Be sure to set stop S1 as far to the left
as possible when a straight stitch is desired.
NOTE: The zigzag regulating knob can be
moved into any desired position while the
machine is operating. Do not turn the
zigzag regulating knob when the machine
is at rest and the needle is in the material.
If you do you may bend or break the
needle. Turn the handwheel toward you to
raise the needle out of the material before
operating the regulating knob.
Preparing the Machine for Rope
Stitching (Model 99R-3 only)
For rope stitching, the standard combination
of presser foot, feed dog, and (throat) needle plate
is replaced with a special set of components
designed specifically for this purpose. To do this,
move slide plate (S of fig. 9-47) as far to the left
239.456
Figure 9-47.—Rope stitching.
9-36