Repairing Facing and Core Damage
When the entire wall has been penetrated, as shown
in figure 5-9, view B, one-half of the damaged plies
The repair of facings and cores requires more than
should be removed from one side and the replacement
one method of repair. Special attention must be given to
buildup completed; then, repeat removal and buildup
the type of core used.
procedure on the opposite side. If the damage occurs
over a relatively large or curved area, make up a plaster
HONEYCOMB CORE.--The repair of facings
mold that conforms to the contour and extends 1 inch
and cores requires more than one method of repair.
past the damage, and insert it in the damaged area when
Special attention must be given to the type of core used.
repairing the first half of the plies. When the stepped
Damages extending completely through one facing of
method of repair is used, the dimensions should be
the material and into the core require removal of the
maintained as illustrated.
damaged core and replacement of the damaged facings
in such a manner that normal stresses can be carried
In areas that have become delaminated, or that
over the area. The scarfed method, illustrated in figure
contain voids or bubbles, clean with MEK and
5-11, is the preferred method for accomplishing small
determine the extent of the delamination; and then drill
repairs of this type. Repairs of this type may be
holes at each end or on the opposite sides of the void by
accomplished as follows:
using a No. 55 drill bit, extending through the
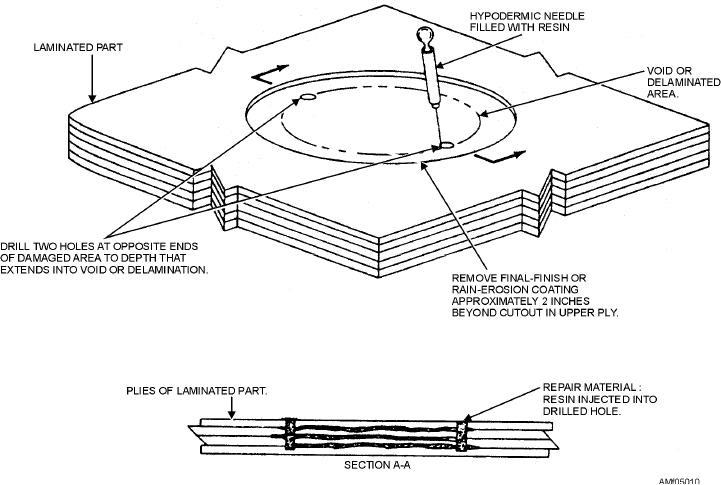
delaminated plies. Figure 5-10 shows the procedure for
Carefully trim out the damaged portion to a circular
repair of delaminated plies.
or oval shape and remove the core completely to the
opposite facing. Be careful not to damage the opposite
Additional holes may be needed if air entrapment
facing. The damaged facing around the trimmed hole is
occurs when you inject the resin. Use a hypodermic
then scarfed back carefully by sanding. The length of
needle or syringe and slowly inject the appropriate
the scarf should be at least 100 times the facing
amount of resin until the void is filled and the resin
thickness, as shown in view B of figure 5-11. This
flows freely from the drilled holes. After the voids are
scarfing operation must be done very accurately to a
completely filled, bring the area down to proper
uniform taper.
thickness by working the excess resin out through the
holes, and then cure and refinish.
Figure 5-10.--Delaminated ply repair.
5-8

