possible damage to the layers underneath. If the layer of
Clean the area thoroughly, brush coat the sanded
glass cloth underneath is scratched or cut, the strength
area with one coat of room-temperature catalyzed resin,
of the repair will be lessened. You should exercise care
and apply the contoured pieces of resin-impregnated
not to peel back or rupture the adhesion of the laminate
cloth, as shown in view C of figure 5-8. Tape a sheet of
layers beyond the cutout perimeter. You can
cellophane over the built-up repair and work out the
accomplish removal of the cutouts by peeling from the
excess resin and air bubbles. Cure the repair in
center and working carefully to the desired perimeter of
accordance with the resin manufacturer's instructions,
the cutout. Scrape each step, wipe clean with cloths
and then sand the surface down (if necessary) to the
moistened with MEK, and allow to dry thoroughly. Cut
original surface of the facing.
the replacement glass fabric pieces to an exact fit, with
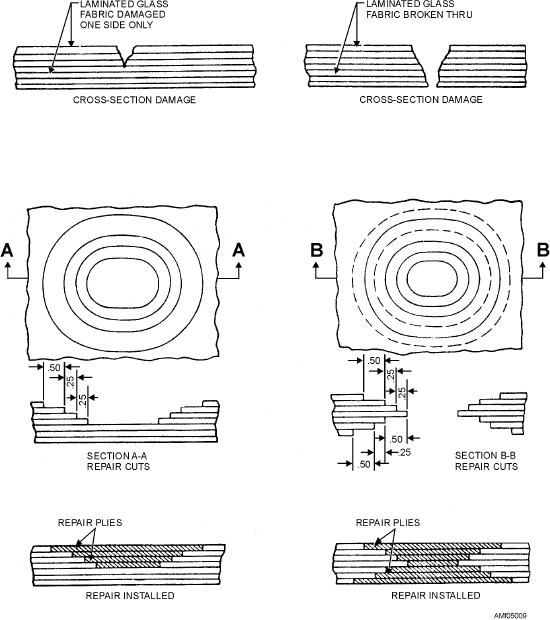
PLY DAMAGE (SOLID LAMINATES).--Ply
the weave directions of the replacement plies running in
damage to solid laminates may be repaired by using the
the same direction as the existing plies. Failure to
scarfed method described for sandwich-type laminates,
maintain the existing weave direction will result in a
shown in figure 5-8, or the stepped method, shown in
repair that is greatly under strength. Replace each piece
figure 5-9, view A, may be used.
of fabric, being careful to butt the existing layers of
When the wall is being prepared for the stepped
fabric plies together, but do not overlap them. The
repair, a cutting tool with a controlled depth will
laminate layers should be kept to the proper matching
facilitate the cutout and should be used to avoid
thickness.
Figure 5-9.--Repair of solid laminates (stepped method).
5-7

