
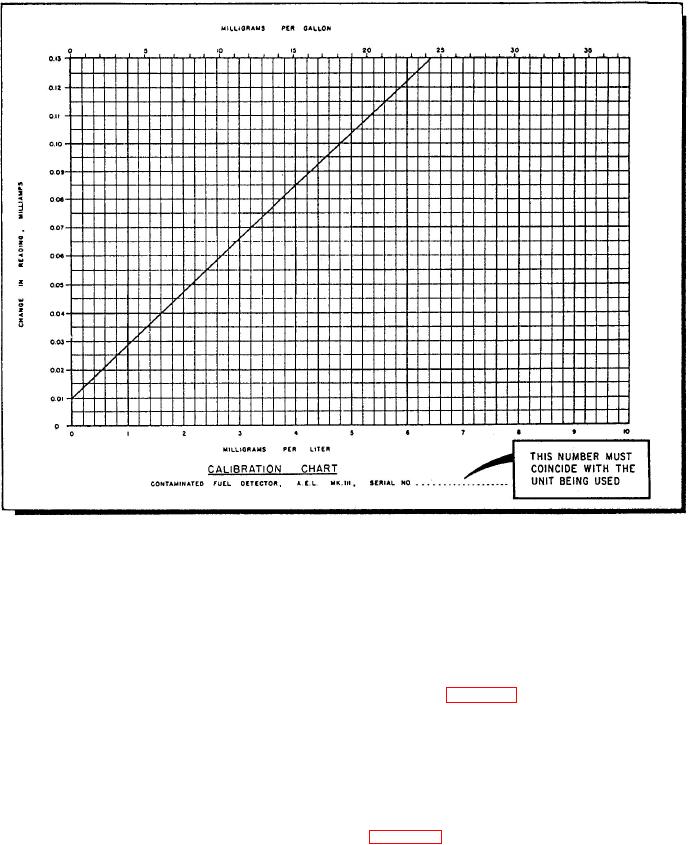
Figure 2-8.--Calibration chart.
filter assembly. Watch to make sure all the fuel
14. Subtract the contaminated filter reading (filter
drains through the filters. Next, turn off the
No. 1) from the clean filter reading (filter No.
pump. By now, the light should have had
2). Find the corresponding contamination
sufficient time to warm up and you can proceed
value in milligrams per liter (mg/L) on the
with the calibration process, starting with the
calibration curve chart, such as the one shown
next step.
in figure 2-8. Calibration chart readings of 5
mg/L or less are acceptable and equate to 2.64
11. Making sure there is no filter in the receptacle
mg/L or less. You will not need to make
and the photocell is clean, swing the photocell
corrections for sample size.
into the measuring position. Use the rheostat
knob to adjust the millimeter until you get a
With a little practice, you will have no difficulty
reading of 0.6.
using the calibration curve chart. For example, take
the following numbers and plot them on the chart in
12. Using the forceps, pick up the contaminated
figure 2-8: Filter No. 1 (contaminated) equals 0.02
filter. Wet the filter completely by pouring a
milliamps. Filter No. 2 (clean) equals 0.06. Subtract
small amount of clean F-76 on the working
the reading for filter No. 1 from that of filter No. 2 .
surface and laying the filter in it. Make sure
Your answer should equal 0.04 milliamps. To find the
you get the entire filter wet with fuel.
mg/L reading, look on the left side of the chart and
locate 0.04 milliamps. Draw a straight line across the
13. Using your forceps, place the wet filter in the
chart until you intersect the calibration line. At this
measuring receptacle under the photocell.
point, move your pencil straight down to find the fuel
Record the reading on the millimeter and
contamination level. If you have done these steps
remove the filter. Now, repeat the process with
correctly, you should have a reading of 1.6 mg/L.
the second filter.
2-15